Week 7
Data security: validation, sanitization
Quiz 6: Data models 15 mins
There will be a quiz today. It will be worth 2% of your final grade.
Agenda
- Guest Speaker (50 mins)
- Break (10 mins)
- AMA (10 mins)
- Quiz (10 mins)
- Better Debugging (20 mins)
- Input Sanitization (20 mins)
- Break (10 mins)
- Data Validation (20 mins)
- Lab Time (30 mins)
Better Debugging
Before we dig into recommended practices for guarding against data corruption and scripting attacks through input data validation and sanitization, let's add another tool to our development toolbox.
The debug NPM module is a better console.log that you can turn on and off with an environment variable instead of commenting out the debugging statements in your code. It is used internally by all of the modules in the Express framework, and we can use it in our modules as well.
Install debug as a project dependency.
npm install debug
Make it available in app.js and set the namespace to the application name.
TIP
The primary debug namespace should match the name property in package.json.
'use strict'

const debug = require('debug')('week7')
const express = require('express')

require('./startup/database')() // IIFE

const app = express()
app.use(express.json())

const port = process.env.PORT || 3030
app.listen(port, () => debug(`Express is listening on port ${port} ...`))
To keep the main entry module for our project (app.js) as clean as possible. It is a good practice to move one-time setup activities, like connecting to the database, into separate modules in a /startup or a /bootstrap folder. Let's put our Mongoose connection setup code from week 6 in the /startup/database.js module.
Then at the top of that file, require the debug module setting the namespace to week7:db and change any console.log() statements to debug() statements. The completed code should look like this.
const debug = require('debug')('week7:db')
const mongoose = require('mongoose')

module.exports = () => {
  mongoose
    .connect(`mongodb://localhost:27017/mad9124`, {
      useNewUrlParser: true,
      useUnifiedTopology: true
    })
    .then(() => {
      debug(`Connected to MongoDB ...`)
    })
    .catch(err => {
      debug(`Error connecting to MongoDB ...`, err)
      process.exit(1)
    })
}
Environment Variables
Remember
The debug module suppresses output by default.
If we run the app now with node app.js it will not output anything to the console. We need to activate it by setting the DEBUG environment variable to our application namespace before running the application.
DEBUG=week7 node app.js
Hmmm ... still not quite right. We only saw the debug message from app.js, not from the database connection module. Debug allows us to be very selective about which module's messages we want to see. If we run it again with ...
DEBUG=week7:db node app.js
... now we only see the database connection message.
To see all related namespaces we can use the * wildcard character.
DEBUG=week7* node app.js
NPM Scripts
Our application startup command is starting to get long. What if we want to add some other environment variables like NODE_ENV or PORT?
DEBUG=week7* NODE_ENV=dev PORT=3000 node app.js
NPM has a solution to make this easier. In the package.json file there is a scripts option. We can set different startup instructions for different environments. By default, it looks like this.
"scripts": {
    "test": "echo \"Error: no test specified\" && exit 1"
  },
Let's add a start script for production and a dev script to use with our local development.
"scripts": {
    "start": "NODE_ENV=production PORT=433 node app.js",
    "dev": "DEBUG=week7* NODE_ENV=dev PORT=3000 nodemon app.js",
    "test": "echo \"Error: no test specified\" && exit 1"
  },
Now we can start our development server by running ...
npm run dev
Or we can start up in production mode with npm start.
TIP
We have more configuration work to do before we are ready for production mode. We will cover that in a few weeks.
Sanitization
The very nature of our application is to take user input and act on it in some way, either to store information or searching and filtering information from the database. The data stored is ultimately returned to the client application.
This means that our web service application is inherently vulnerable to a variety of malicious attacks. We cannot trust any data coming from the client application. It might not be our code. It may have been hacked. A malicious actor may be using it to directly input data formatted to cause our system to malfunction.
The Open Web Application Security Project (OWASP) is an excellent resource for staying up to date on application security risks and best practices. Among their many resources, the annual OWASP Top 10 Critical Web Application Security Risks should be on your reading list.
Directly relevant to our task is the OWASP Node Goat Tutorial that provides examples of the Top 10 in a Node.js application environment.
Let's look at solving the two most damaging attack types: Cross-site scripting (XSS) and Database Injection. To do that, we need to filter and cleanse all incoming data.
XSS Protection
To help protect against Cross-site scripting (XSS) attacks we need to strip out any HTML or script tags from the input values so that they would not be interpreted as scripts or alter the browser rendering of any returned data. We will use the xss NPM package.
We will build a small middleware function to implement this behaviour. Create a new file in the middleware folder called sanitizeBody.js. Require the debug and xss modules at the top. Then add an empty middleware function signature. (We will fill in the logic in the next step.)
const debug = require('debug')('sanitize:body')
const xss = require('xss')

module.exports = (req, res, next) => {
  // sanitization logic goes here
  next()
}
Remember
It is a good practice not to take destructive action on the original request body. So, make a copy to work with and set the resulting sanitized version as a new property of the request object that downstream route handlers can access.
Start by stripping out any id, or _id properties. We never want those.
const {id, _id, ...attributes} = req.body
The xss module applies its filter rules to strings. To apply it to the various properties of our user supplied data, we will need to loop over the members of the req.body object with a for...in loop.
The xss function takes an optional configuration object to customize how it works.
for (let key in attributes) {
  attributes[key] = xss(attributes[key], {
    whiteList: [], // empty, means filter out all tags
    stripIgnoreTag: true, // filter out all HTML not in the whitelist
    stripIgnoreTagBody: ['script']
    // the script tag is a special case, we need
    // to filter out its content
  })
}
Lastly set the modified attributes as the value of a new req.sanitizedBody property and then call next(). The whole thing should look similar to this.
const debug = require('debug')('sanitize:body')
const xss = require('xss')

module.exports = (req, res, next) => {
  debug({body: req.body})
  const {id, _id, ...attributes} = req.body
  debug({attributes})
  for (let key in attributes) {
    attributes[key] = xss(attributes[key], {
      whiteList: [],
      stripIgnoreTag: true,
      stripIgnoreTagBody: ['script']
    })
  }
  debug({sanitizedBody: attributes})
  req.sanitizedBody = attributes
  next()
}
TIP
Notice that I added some debug statements just to help verify that everything is working. To see these print out, add modify the dev script's debug environment variable in the package.json file to DEBUG=week7*,sanitize*
OK, we have our body sanitizer middleware function. How do we use it?
Remember, Express route method declarations can take more than one callback function. This lets us call one or more middleware functions directly for any given route.
app.post('/test', middleware, routeHandler)
So, in our /routes/cars.js module, we could do this ...
const sanitizeBody = require('./middleware/sanitizeBody')
const Car = require('./models/Car')
// ... other setup

router.post('/', sanitizeBody, async (req, res) => {
  try {
    const newCar = new Car(req.sanitizedBody)
    await newCar.save()
    res.send({data: newCar})
  } catch (err) {
    errorHandlerFunction(err)
  }
})
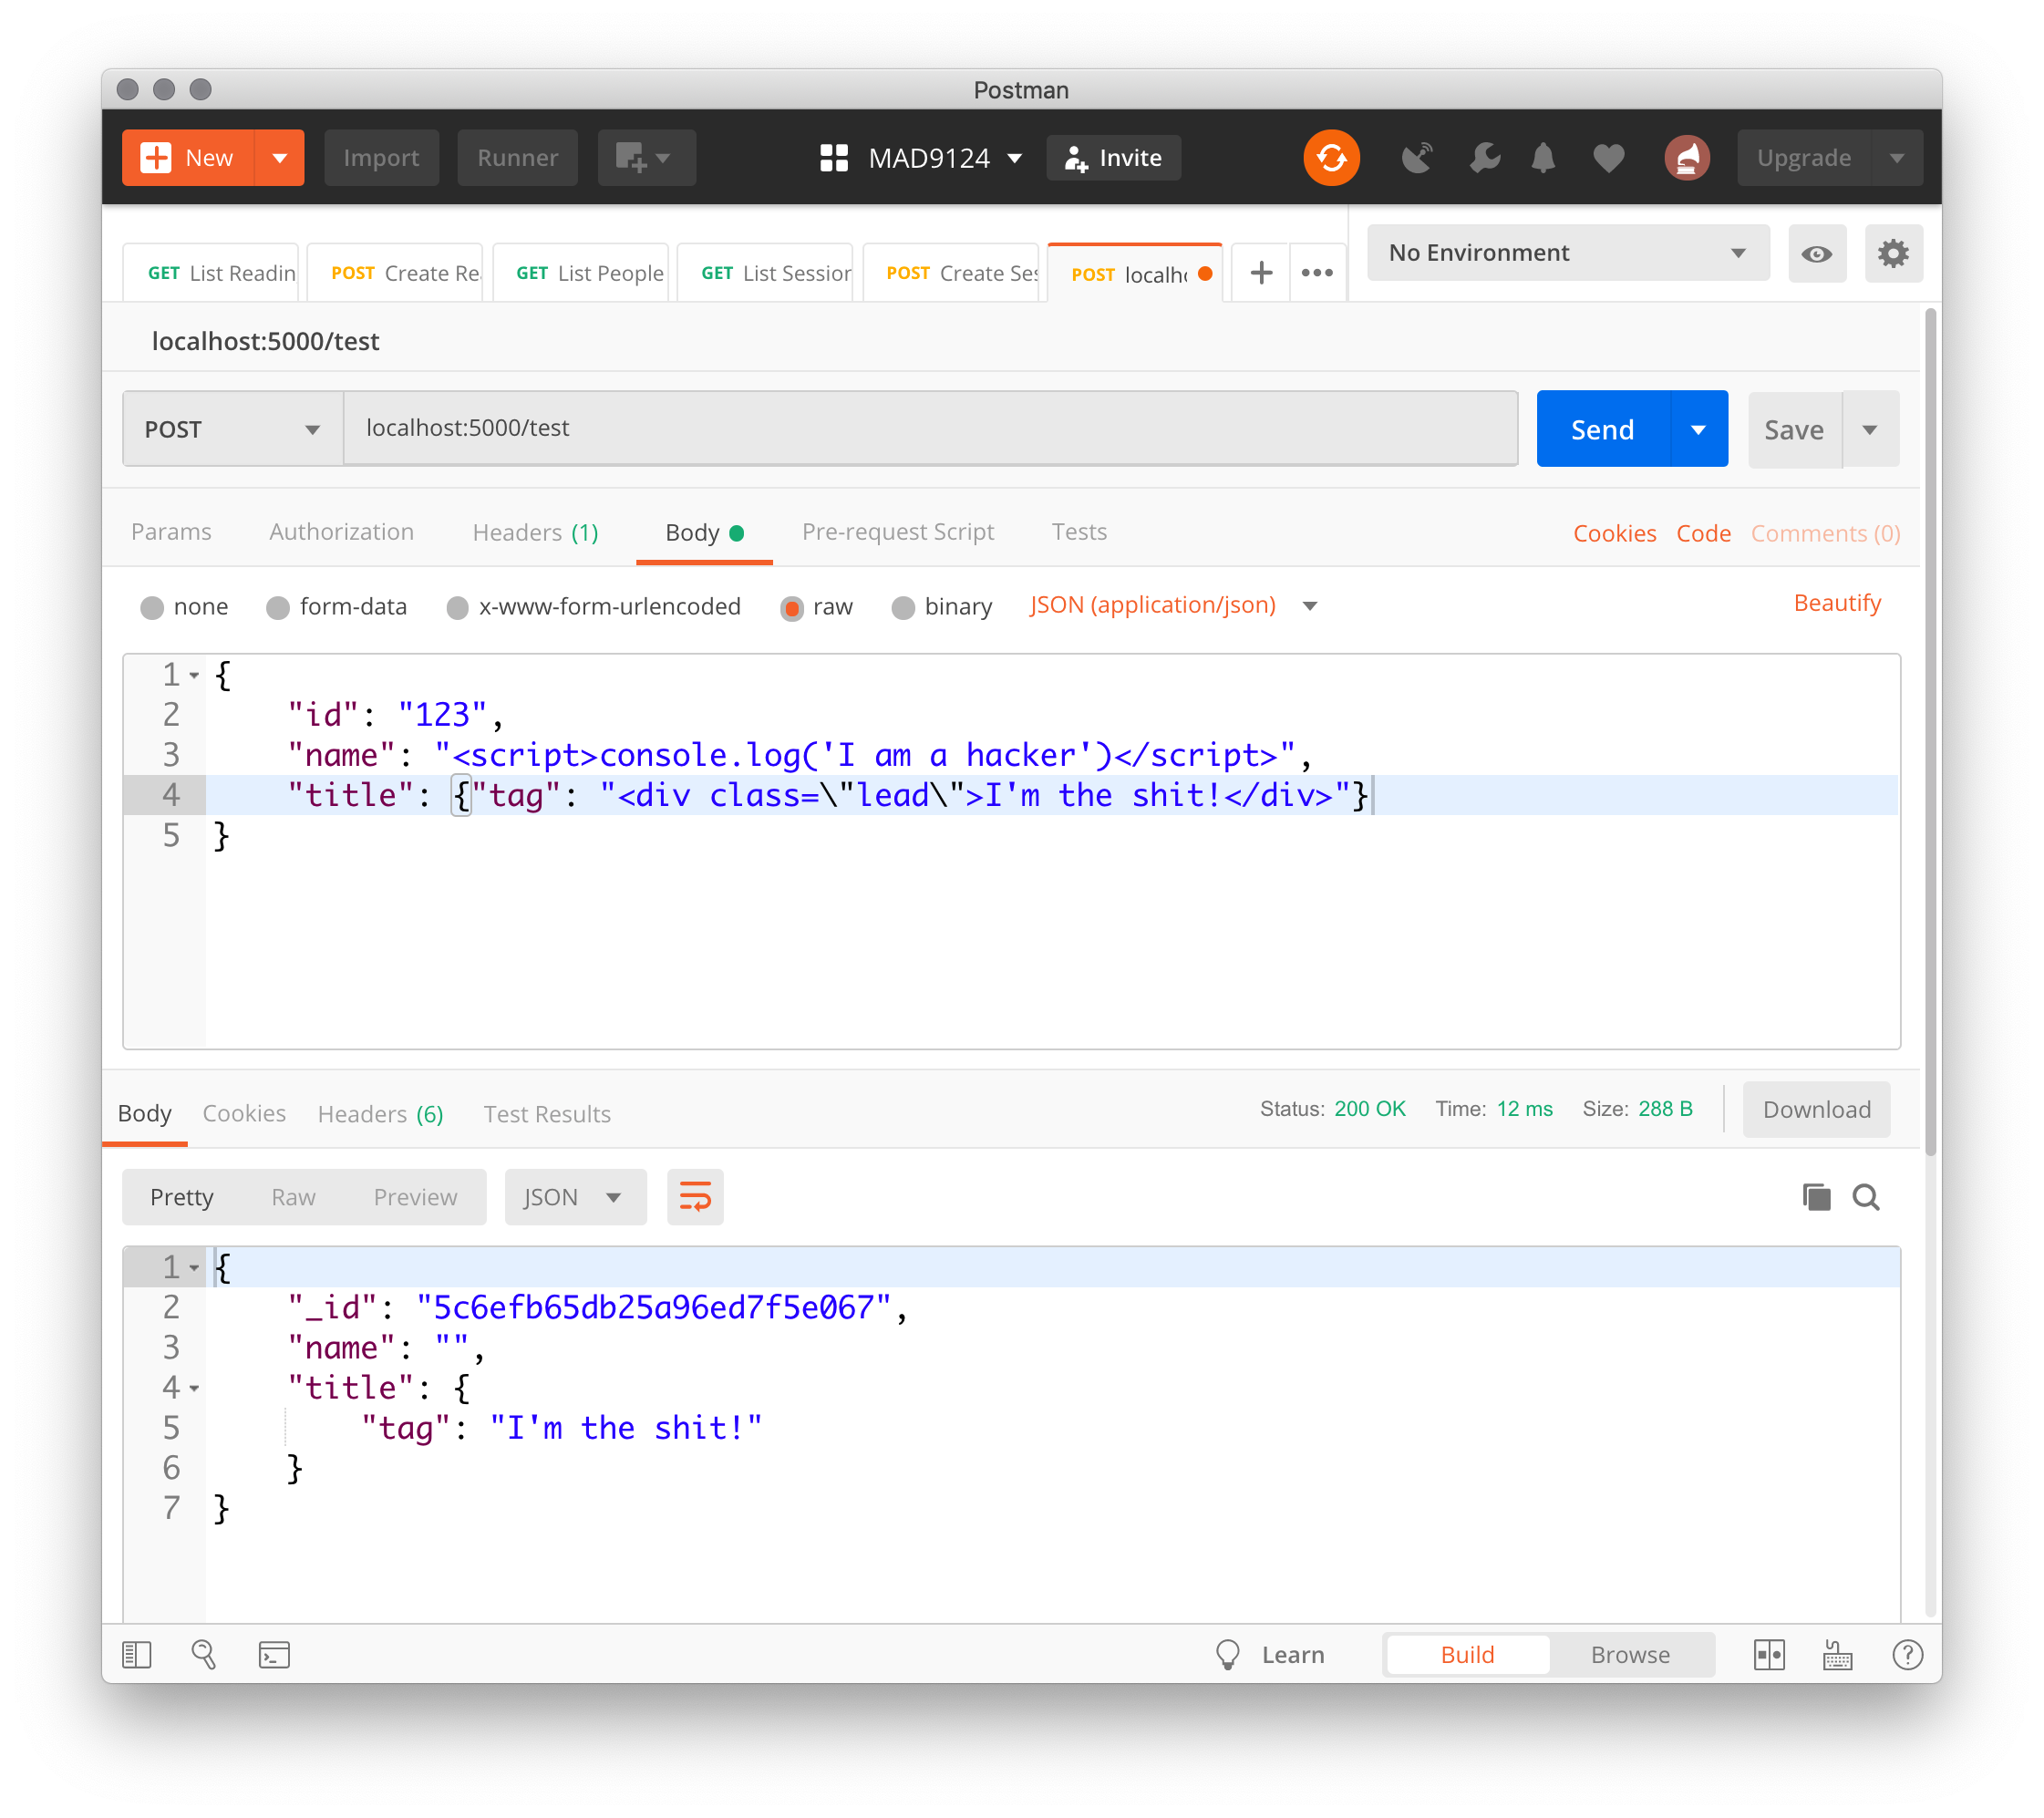
We can now be reasonably confident that only plain text strings will be passed to Mongoose for validation. Potentially malicious HTML and JavaScript will be removed from input strings.
We can test it with Postman.

Yay! It worked!
But wait. What if the payload attributes are not simple strings? We need to refactor the sanitizeBody middleware to call itself recursively for more complex data structures.
Recursion
From The Modern JavaScript Tutorial
When a function solves a task, in the process it can call many other functions. A partial case of this is when a function calls itself. That’s called recursion.
We will start by creating a new function called stripTags. It should take a single argument - let's call it payload. Now cut the for...in loop from the main function and paste it into the new one. As a best practice, we should not mutate the original payload object that is passed in, so let's make a copy of that with the line let attributes = {...payload}. Don't forget to return the sanitized attributes at the end of this new function.
Then call the new stripTags function from within the primary function. The refactored middleware should now look like this.
const debug = require('debug')('sanitize:body')
const xss = require('xss')

const stripTags = payload => {
  let attributes = {...payload}
  for (let key in attributes) {
    attributes[key] = xss(attributes[key], {
      whiteList: [],
      stripIgnoreTag: true,
      stripIgnoreTagBody: ['script']
    })
  }
  return attributes
}

module.exports = (req, res, next) => {
  debug({body: req.body})
  const {id, _id, ...attributes} = req.body
  debug({attributes})
  const sanitizedBody = stripTags(attributes)
  debug({sanitizedBody: sanitizedBody})
  req.sanitizedBody = sanitizedBody
  next()
}
This version should be functionally equivalent to what we had before. Test it with Postman to be sure that it is working.
OK now we can augment the stripTags function to check for objects and then call itself to loop over that nested object and sanitize it's properties. Wrap the logic inside the for..in loop in an if/else block.
for (let key in attributes) {
  if (attributes[key] instanceof Object) {
    attributes[key] = stripTags(attributes[key])
  } else {
    attributes[key] = xss(attributes[key], {
      whiteList: [],
      stripIgnoreTag: true,
      stripIgnoreTagBody: ['script']
    })
  }
}
Test that with Postman ...
Great! Now let's make sure that we handle Arrays properly. Since arrays inherit from Object in JavaScript, we need to check for that case first. Then instead of just recursively calling stripTags on the array, we need to use the .map() method to loop over the array.
Each element could be another complex object or a simple string. We need to check and handle both cases. If it is a string we can call xss() otherwise call stripTags() again.
Rather than duplicate the code for the xss() function call, let's extract that to a separate function in our module.
const sanitize = sourceString => {
  return xss(sourceString, {
    whiteList: [],
    stripIgnoreTag: true,
    stripIgnoreTagBody: ['script']
  })
}
Then the conditional block in the stripTags() function becomes ...
if (attributes[key] instanceof Array) {
  attributes[key] = attributes[key].map(element => {
    return typeof element === 'string' ? sanitize(element) : stripTags(element)
  })
} else if (attributes[key] instanceof Object) {
  attributes[key] = stripTags(attributes[key])
} else {
  attributes[key] = sanitize(attributes[key])
}
TIP
The return statement of the map() method above is using JavaScript's ternary operator, rather than a more verbose if/else block.
Writing out that single ternary expression the long way would look something like this ...
let cleanedElement
if (typeof element === 'string') {
  cleanedElement = sanitize(element)
} else {
  cleanedElement = stripTags(element)
}
return cleanedElement
OK. Test that with Postman ...

Phew!
The final version of the sanitizeBody.js middleware module should look similar to this (with no debug statements).
const xss = require('xss')

const sanitize = sourceString => {
  return xss(sourceString, {
    whiteList: [],
    stripIgnoreTag: true,
    stripIgnoreTagBody: ['script']
  })
}

const stripTags = payload => {
  let attributes = { ...payload } // don't mutate the source data
  for (let key in attributes) {
    if (attributes[key] instanceof Array) {
      attributes[key] = attributes[key].map(element => {
        return typeof element === 'string'
          ? sanitize(element) // if true
          : stripTags(element) // if false
      })
    } else if (attributes[key] instanceof Object) {
      attributes[key] = stripTags(attributes[key])
    } else {
      attributes[key] = sanitize(attributes[key])
    }
  }
  return attributes
}

module.exports = (req, res, next) => {
  const { id, _id, ...attributes } = req.body
  const sanitizedBody = stripTags(attributes)
  req.sanitizedBody = sanitizedBody
  next()
}
OK. Now we can be reasonably sure that all HTML tags and scripts will be removed from all req.body properties, no matter how deeply they are buried.
Database Injection
Using Mongoose which enforces schema validation and attempts type coercion to ensure that only data in the correct format is stored, goes a long way to protecting MongoDB from various attacks. However, there are still some cases that are not covered.
Read Hacking Node.js and MongoDB to learn more about this kind of vulnerability.
To help protect against database injection attacks, we will use the Express Mongoose Sanitize NPM package.
From the docs ...
What?
This module searches for any keys in objects that begin with a $ sign or contain a ., from req.body, req.query or req.params. It can then either:
- completely remove these keys and associated data from the object, or
- replace the prohibited characters with another allowed character.
The behaviour is governed by the passed option, replaceWith. Set this option to have the sanitizer replace the prohibited characters with the character passed in.
Why?
Object keys starting with a $ or containing a . are reserved for use by MongoDB as operators. Without this sanitization, malicious users could send an object containing a $ operator, or including a ., which could change the context of a database operation. Most notorious is the $where operator, which can execute arbitrary JavaScript on the database.
The best way to prevent this is to sanitize the received data, and remove any offending keys, or replace the characters with a 'safe' one.
Let's install it
npm install express-mongo-sanitize
Let's implement it
We could implement this middleware on a route by route basis. e.g.
router.post('/:id', sanitizeMongo(), (req, res) => {})
Or at the router level ...
app.use('/api/cars', sanitizeMongo(), carsRouter)
Or at the application level ...
app.use(sanitizeMongo())
Let's choose the application level -- set it and forget it!
Don't forget
You need to require the module before you can use it.
const sanitizeMongo = require('express-mongo-sanitize')
For next week
Before next week's class, please read these additional online resources.
- Learn and Understand Recursion in JavaScript
- An Introduction to Content Security Policy
- Hacking Node.js and MongoDB
- OWASP Node Goat Tutorial
Assignment Reminder
Assignment 2 - Mongo CRUD - is due before 1:00 pm on Friday, March 6th.
Quiz
There will be a short quiz next class. The questions could come from any of the material referenced above.
Next week is Break Week
This is a great opportunity to review the course notes and the linked hybrid study materials from what we have covered so far.
As a self-assessment tool to help you identify areas that might need more review, I have posted an optional ungraded review quiz covering the first half of the term.