Week 6
Object Data Modeling with Mongoose
Quiz 5: Databases 15 mins
There will be a quiz today. It will be worth 2% of your final grade.
Agenda
- AMA (10 min)
- Quiz (10 min)
- Mongoose Models (20 mins)
- Mongoose Query Methods (10 mins)
- Break (10 min)
- EX6-1 Mongo Cars (50 min)
- Break (10 min)
- EX6-2 Car Owner (50 mins)
Mongoose Models
Mongoose is a Node.js based Object Data Modeling (ODM) library for MongoDB. We use it to abstract away the lower level MongoDB access APIs and manage the shape of our application's resource data structures. This is the M in the MVC software architecture pattern.
Mongoose provides two core features to simplify the implementation of a MongoDB backed application.
The
mongoose.model()method is a class factory -- meaning it is a function that returns a new class object which we can then use to instantiate individual document objects. This factory function takes two arguments: the name of the resource that this model represents, and a schema object describing the properties of that resource.The
mongoose.Schemaclass is used to define the expected shape of resource properties -- their names, types, and validation limits.
Schema
A model schema could be a simple object specifying the property names and types.
const catSchema = new mongoose.Schema({
  name: String,
  age: Number
})
Or it can be expressed with more detailed options.
const catSchema = new mongoose.Schema({
  name: {type: String, minlength: 3, maxlength: 50, required: true},
  age: {type: Number, min: 0, max: 25}
})
Schema Types
The following Mongoose Schema Types are permitted:
- Array
- Boolean
- Buffer
- Date
- Mixed (A generic / flexible data type)
- Number
- ObjectId
- String
Mixed and ObjectId are defined under mongoose.Schema.Types. We will look at this a little later when we create an owner relationship for our cars API.
Making Models
First we need to use the schema object with the model() factory method to generate a new class.
const Cat = mongoose.model('Cat', catSchema)
... and then we can use that Cat model to instantiate a new mongoose document instance.
const kitty = new Cat({name: 'Spot', age: 2})
The mongoose model class factory generates new class objects, customized with the given schema, that inherit all of the methods required to interact with the MongoDB service. This includes a list of static class methods as well as instance methods. e.g.
// example class method
Cat.find()

// example instance method
kitty.save()
Relationships
Most applications have more complex data structures that our simple Cat model. Often that involves a relationship to another model. For example we might want to extend our Cat model to include an owner. In traditional SQL database systems, this means creating a new table to store the details about the Person that is the owner of the Cat, and then adding a new property like owner_id to the Cat schema to store the foreign key pointer to people.id.
Document databases like MongoDB give us two options: embedded documents, and document references.
Document References
Document references are similar to an SQL foreign key. It stores the _id value of a document in another collection. Unlike SQL databases this relationship is not enforced at the database level -- there is no validation that the reference id exists. We would add it to the schema like this, where the ref option is the name of another model class in our application.
const catSchema = new mongoose.Schema({
  name: {type: String, minlength: 3, maxlength: 50, required: true},
  age: {type: Number, min: 0, max: 25},
  owner: {type: mongoose.Schema.Types.ObjectId, ref: 'Person'}
})
Another difference from SQL is that the reference property could be an array.
const catSchema = new mongoose.Schema({
  name: {type: String, minlength: 3, maxlength: 50, required: true},
  age: {type: Number, min: 0, max: 25},
  owners: [{type: mongoose.Schema.Types.ObjectId, ref: 'Person'}]
})
Embedded Documents
The other option is to embed the related documents as properties of the main document.
const personSchema = new mongoose.Schema({
  firstName: String,
  lastName: String,
  phoneNumber: Number
})

const catSchema = new mongoose.Schema({
  name: {type: String, minlength: 3, maxlength: 50, required: true},
  age: {type: Number, min: 0, max: 25},
  owners: [personSchema]
})

const Cat = mongoose.model('Cat', catSchema)

const kitty = new Cat({
  name: 'Fluffy',
  age: 4,
  owners: [
    {firstName: 'Mickey', lastName: 'Mouse', phoneNumber: 14155551212},
    {firstName: 'Minnie', lastName: 'Mouse', phoneNumber: 14155551212}
  ]
})
Tradeoffs
The relationship modeling method you choose is ultimately a tradeoff between query speed and data consistency.
The referenced documents method ensures that data remains consistent because it is stored in only one place for each schema model, but it requires an additional database query for each related document when retrieving the primary document. For queries returning a single document (most CRUD operations) this may be fine. However for complex search queries returning thousands of results, there could be a significant performance hit.
The embedded document method avoids these additional database queries when retrieving data, but exponentially increases the complexity of maintaining data consistency because we are storing the same data in many places and need to update them all.
If we look at the Cat example above, and consider what happens when we want to change Mickey Mouse's phone number. In the reference method, we simply find the Person document for Mickey Mouse and update the phoneNumber property. Then whenever we need to contact Fluffy's owner, the data will be correct.
However if we use the embed method, we have to lookup all of the Cats that have an owner with the name Mickey Mouse and then update the embedded phone number. But what if there is more than one Person named Mickey Mouse? How do we know if we are updating the correct information? It can get messy if we don't plan it out well.
Mongoose Query Methods
Mongoose models provide several static helper functions for CRUD operations. Each of these functions returns a mongoose Query object ... A query also has a
.then()function, and thus can be used as a promise.
Review the mongoose documentation for the full list, but these are the most common ones that we will be using.
Model.find() is used to get an array of documents matching the given filter criteria.
const catsNamedSpot = Cat.find({name: 'Spot'})
These methods act on a single document matching the given id parameter.
- Model.findById()
- Model.findByIdAndRemove()
- Model.findByIdAndUpdate()
These methods act on the first document found matching the given filter criteria.
- Model.findOne()
- Model.findOneAndRemove()
- Model.findOneAndUpdate()
Mongo Query Operators
In the filter criteria objects we can use any of the standard MongoDB query operators. The syntax is to provide an object as the filter condition value for the given property. That object will have one of the Mongo query operators as it's key and the coresponding relative value. Let's look at some examples.
const catsAgedFourOrMore = Cat.find({age: {$gte: 4}})
const catsAgedLessThanFour = Cat.find({age: {$lt: 4}})
const catsAgedTwoFourOrSix = Cat.find({age: {$in: [2, 4, 6]}})
const catsNotAgedTwoFourOrSix = Cat.find({age: {$nin: [2, 4, 6]}})
Mongoose Query Helpers
Mongoose provides some helper functions to make writing your queries more fluent. The syntax is sometimes more readable, but the end result is exactly the same. So, use whichever method is easier for you.
const catsAgedFourOrMore = Cat.find()
  .where('age')
  .gte(4)
const catsAgedLessThanFour = Cat.find()
  .where('age')
  .lt(4)
const catsAgedTwoFourOrSix = Cat.find()
  .where('age')
  .in([2, 4, 6])
const catsNotAgedTwoFourOrSix = Cat.find()
  .where('age')
  .nin([2, 4, 6])
EX6-1 Mongo Cars
We are going to recreate our Cars API with Mongoose and MongoDB. Let start by creating a new project folder. I called mine week6.
mkdir week6
cd week6
touch app.js
npm init --yes
echo 'node_modules/' > .gitignore
git init
Connect to MongoDB
Before we can use Mongoose to connect to our MongoDB, we need to add it as an NPM dependency for our project.
npm install mongoose
We only need to create the connection to MongoDB once in our application. We should do it in app.js, right at the top, before we initialize Express. If we cannot connect to the database, then we cannot proceed. So, we will use the process.exit([code]) function to terminate the node.js runtime.
Just like last week, we require mongoose and then give it the connection string. This time the database path will be /mad9124.
'use strict'

const mongoose = require('mongoose')
mongoose
  .connect('mongodb://localhost:27017/mad9124', {
    useNewUrlParser: true,
    useUnifiedTopology: true
  })
  .then(() => console.log('Connected to MongoDB ...'))
  .catch(err => {
    console.error('Problem connecting to MongoDB ...', err)
    process.exit(1)
  })
Let's add the rest of our app.js boilerplate code.
const express = require('express')
const app = express()

app.use(express.json())

const port = process.env.PORT || 3030
app.listen(port, () => console.log(`Server listening on port ${port} ...`))
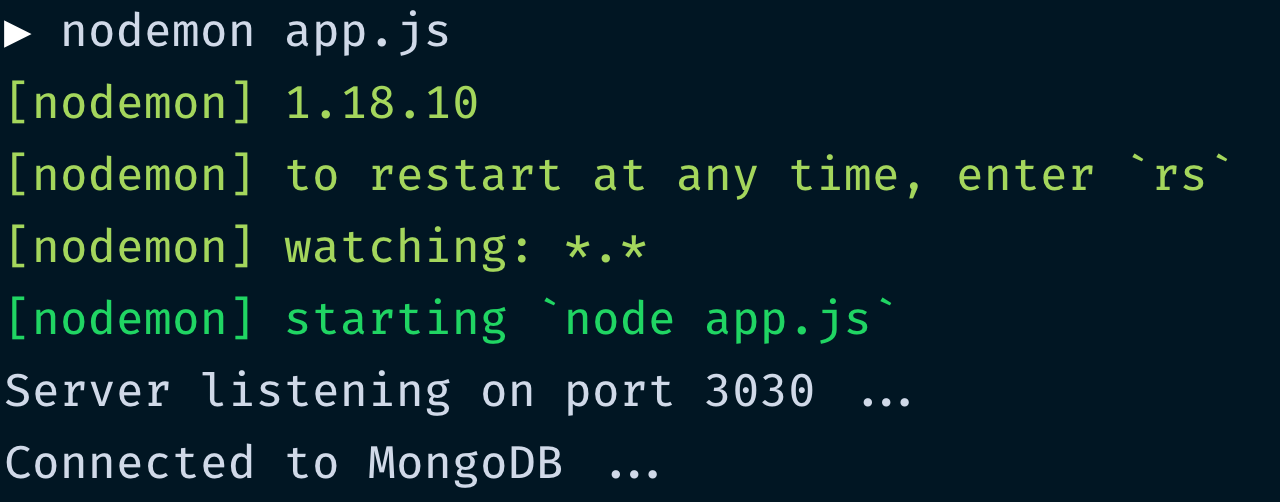
Make sure that MongoDB is running. Copy the docker-compose.yml file from last week into your project folder and run docker-compose up -d. Then if we run our app with nodemon, we should see a successful connection.
Car Model
Before we can do any CRUD operations we need to define a Mongoose.Schema and create a Car Model object. Create a new models folder at the top level of our project and in it create a new file called Car.js -- note the capital 'C' as a reminder that we will be exporting a class.
The basic template for a Mongoose Model module is ...
const mongoose = require('mongoose')

const schema = new mongoose.Schema({})
const Model = mongoose.model('Car', schema)

module.exports = Model
Let's expand the schema definition object on line three. We want to define three properties for our Car documents: make, model and colour. All will be of type String. An _id property with a unique value will be automatically assigned to all new documents.
TIP
Review the full list of Mongoose Schema Types in the official documentation.
const schema = new mongoose.Schema({
  make: String,
  model: String,
  colour: String
})
CRUD with Mongoose
OK, we have a working connection from our Express app to the MongoDB server in our development environment. Now let's setup the API routes to talk to the database instead of an in memory array.
Create a routes folder and in that folder create a new file called cars.js and stub out our six route handlers.
const express = require('express')
const router = express.Router()

router.get('/', async (req, res) => {})

router.post('/', async (req, res) => {})

router.get('/:id', async (req, res) => {})

router.patch('/:id', async (req, res) => {})

router.put('/:id', async (req, res) => {})

router.delete('/:id', async (req, res) => {})

module.exports = router
TIP
Since the only time we are using express in this module is to create a router instance. We can directly request the Router() method and immediately invoke it. So this code ...
const express = require('express')
const router = express.Router()
Can be simplified to this code ...
const router = require('express').Router()
But you can certainly write it out the long way if that makes it easier to read for you.
Now let's register the cars router in our main app.js after the express.json() middleware.
app.use(express.json())
app.use('/api/cars', require('./routes/cars'))
GET /api/cars
We can use the find() method to query the Car model for a list all of the cars in the collection. Before we can do that, we need to import the Car model class.
Put this right at the top of /routes/cars.js
const Car = require('../models/Car')
And then we'll update our route handler ...
router.get('/', async (req, res) => {
  const cars = await Car.find()
  res.send({data: cars})
})
TIP
Notice the async/await syntax.
OK. Let's test that in Postman. We should see a status code 200 response with an empty array for the data payload.
{
  "data": []
}
That was easy! Let's do the POST route now so that we can add some cars to the database.
POST /api/cars
Use the req.body as input to create a new instance of the Car model class. Then call the .save() method on that instance to persist it to the database. But first we need to ensure that the client did not try to set the _id value, so we will use the JavaScript delete operator to remove the _id property if it exists.
router.post('/', async (req, res) => {
  let attributes = req.body
  delete attributes._id

  let newCar = new Car(attributes)
  await newCar.save()

  res.status(201).send({data: newCar})
})
TIP
Mongoose models will automatically discard any properties that are not defined in the Model.schema, so our route handler does not need to worry about extracting only permitted properties from the req.body as we had done in week 4.
GET /api/cars/:id
First let's do the happy path ... no error handling. We can use the .findById() static method on the Car model class.
router.get('/:id', async (req, res) => {
  const car = await Car.findById(req.params.id)
  res.send({data: car})
})
OK, now what if the :id does not exist as a unique identifier in our database? We should wrap our code in a try/catch block and then send the appropriate error response back to the client.
router.get('/:id', async (req, res) => {
  try {
    const car = await Car.findById(req.params.id)
    if (!car) throw new Error('Resource not found')
    res.send({data: car})
  } catch (err) {
    res.status(404).send({
      errors: [
        {
          status: 'Not Found',
          code: '404',
          title: 'Resource does not exist',
          description: `We could not find a car with id: ${req.params.id}`
        }
      ]
    })
  }
})
As we have seen before, we will need this same error handler in several other routes. Lets extract this to a function. At the bottom of the /routes/cars.js module, but just above the module.exports line, add this private function.
function sendResourceNotFound(req, res) {
  res.status(404).send({
    errors: [
      {
        status: 'Not Found',
        code: '404',
        title: 'Resource does not exist',
        description: `We could not find a car with id: ${req.params.id}`
      }
    ]
  })
}

module.exports = router
... and then update our route handler's catch block to call this function.
router.get('/:id', async (req, res) => {
  try {
    const car = await Car.findById(req.params.id)
    if (!car) throw new Error('Resource not found')
    res.send({data: car})
  } catch (err) {
    sendResourceNotFound(req, res)
  }
})
PATCH /api/cars/:id
For our update actions, we will use the findByIdAndUpdate() static method on the Car model class. Similar to the findById() method, it takes a document _id value as the first argument. The second argument is an object with the properties to be stored. The third argument is an options object.
Second argument
To ensure that the _id property matches the req.params.id and has not been modified (accidentally or maliciously), we will use object destructuring to separate and discard any _id property that may be included in the req.body. We will then reconstruct the update object, explicitly setting _id: req.params.id and then use the rest operator to extract the remaining attributes.
Options object
The documentation lists many options that can be set to modify the behaviour of the update method. We are interested in two.
Setting
newtotruewill return the updated record from the database. The default behaviour returns the document in it's pre-update state.Setting
runValidatorstotrueensures that our Model.schema rules are checked before the updates are applied.
router.patch('/:id', async (req, res) => {
  try {
    const {_id, ...otherAttributes} = req.body
    const car = await Car.findByIdAndUpdate(
      req.params.id,
      {_id: req.params.id, ...otherAttributes},
      {
        new: true,
        runValidators: true
      }
    )
    if (!car) throw new Error('Resource not found')
    res.send({data: car})
  } catch (err) {
    sendResourceNotFound(req, res)
  }
})
PUT /api/cars/:id
By calling the PUT method, the client is asking us to replace the current document with the one supplied in the req.body. The route handler is identical to the PATH method with one additional property in the options object.
Set the overwrite option to true.
This will update any supplied document properties the same as with the PATCH method, but any document properties that are omitted from the req.body will be removed from the database.
router.put('/:id', async (req, res) => {
  try {
    const {_id, ...otherAttributes} = req.body
    const car = await Car.findByIdAndUpdate(
      req.params.id,
      {_id: req.params.id, ...otherAttributes},
      {
        new: true,
        overwrite: true,
        runValidators: true
      }
    )
    if (!car) throw new Error('Resource not found')
    res.send({data: car})
  } catch (err) {
    sendResourceNotFound(req, res)
  }
})
DELETE /api/cars/:id
This time we want the findByIdAndRemove() static method on the Car model class.
router.delete('/:id', async (req, res) => {
  try {
    const car = await Car.findByIdAndRemove(req.params.id)
    if (!car) throw new Error('Resource not found')
    res.send({data: car})
  } catch (err) {
    sendResourceNotFound(req, res)
  }
})
That's it! We have recreated the cars API from week 4 using MongoDB and Mongoose.
EX6-2 Car Owner
In real life, cars have owners. Let's extend our API to include a /api/people resource path, and link the Person and Car models by the reference method.
Person Model
Create a new file called Person.js in the /models folder.
const mongoose = require('mongoose')

const schema = new mongoose.Schema({
  name: {
    first: String,
    last: String
  },
  email: String,
  birthDate: Date,
  phone: Number,
  address: {
    streetNumber: String,
    streetName: String,
    city: String,
    region: String,
    country: String,
    postalCode: String
  }
})
const Model = mongoose.model('Person', schema)

module.exports = Model
Update Car Model.schema
const schema = new mongoose.Schema({
  make: String,
  model: String,
  colour: String,
  owner: {type: mongoose.Schema.Types.ObjectId, ref: 'Person'}
})
Also, right at the top we need to require the Person model so that Mongoose knows about it. This model would normally be loaded into our application in the people router module, but we haven't built that yet.
const Person = require('./Person')
Populate owner
To expand the reference _id value for the owner property, we need to use the Mongoose .populate() method.
Populated paths are no longer set to their original
_id, their value is replaced with the mongoose document returned from the database by performing a separate query before returning the results.
In our /routes/cars.js file, update the GET /:id route handler to chain the .populate('owner') method onto the findById() method call.
router.get('/:id', async (req, res) => {
  try {
    const car = await Car.findById(req.params.id).populate('owner')
    if (!car) throw new Error('Resource not found')
    res.send({data: car})
  } catch (err) {
    sendResourceNotFound(req, res)
  }
})
Let's test it!
Before we can test this out, there needs to be people in the database, and we need to either add a new car with an owner property or update one.
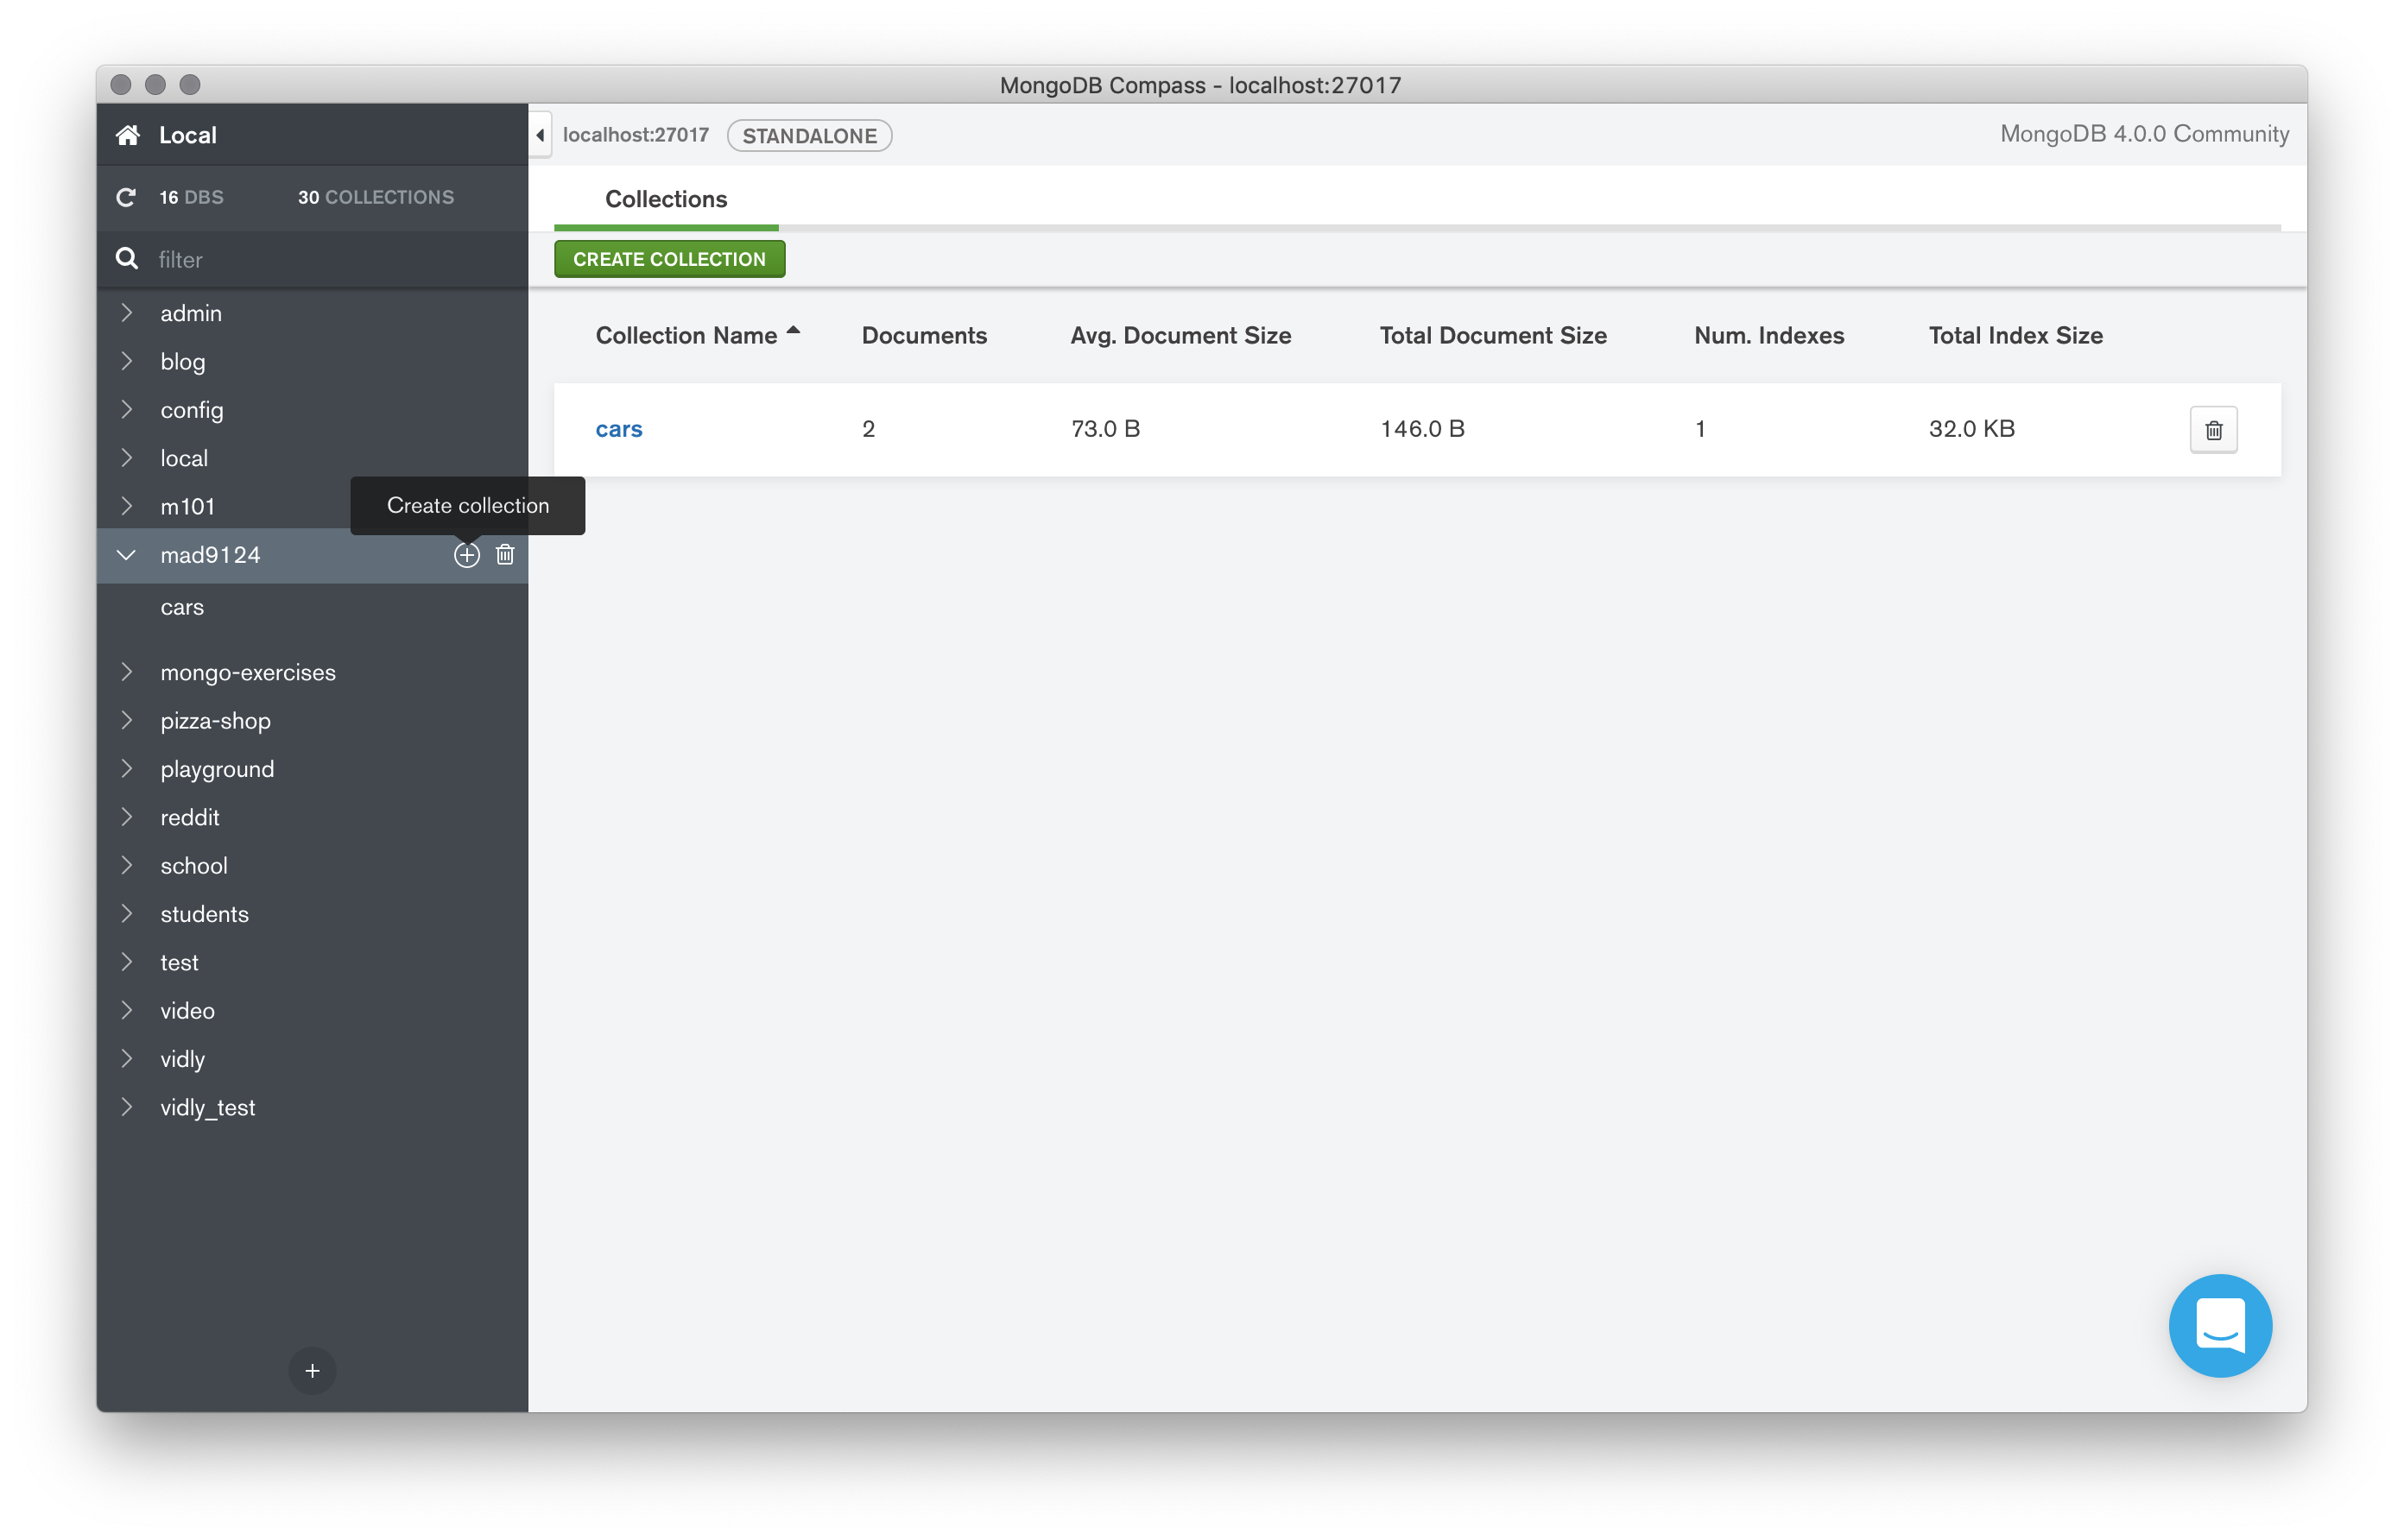
Manually add people collection
Using MongoDB Compass we can manually create the people collection and add a document.
- Select on the
mad9124database in the left sidebar. - Click on the
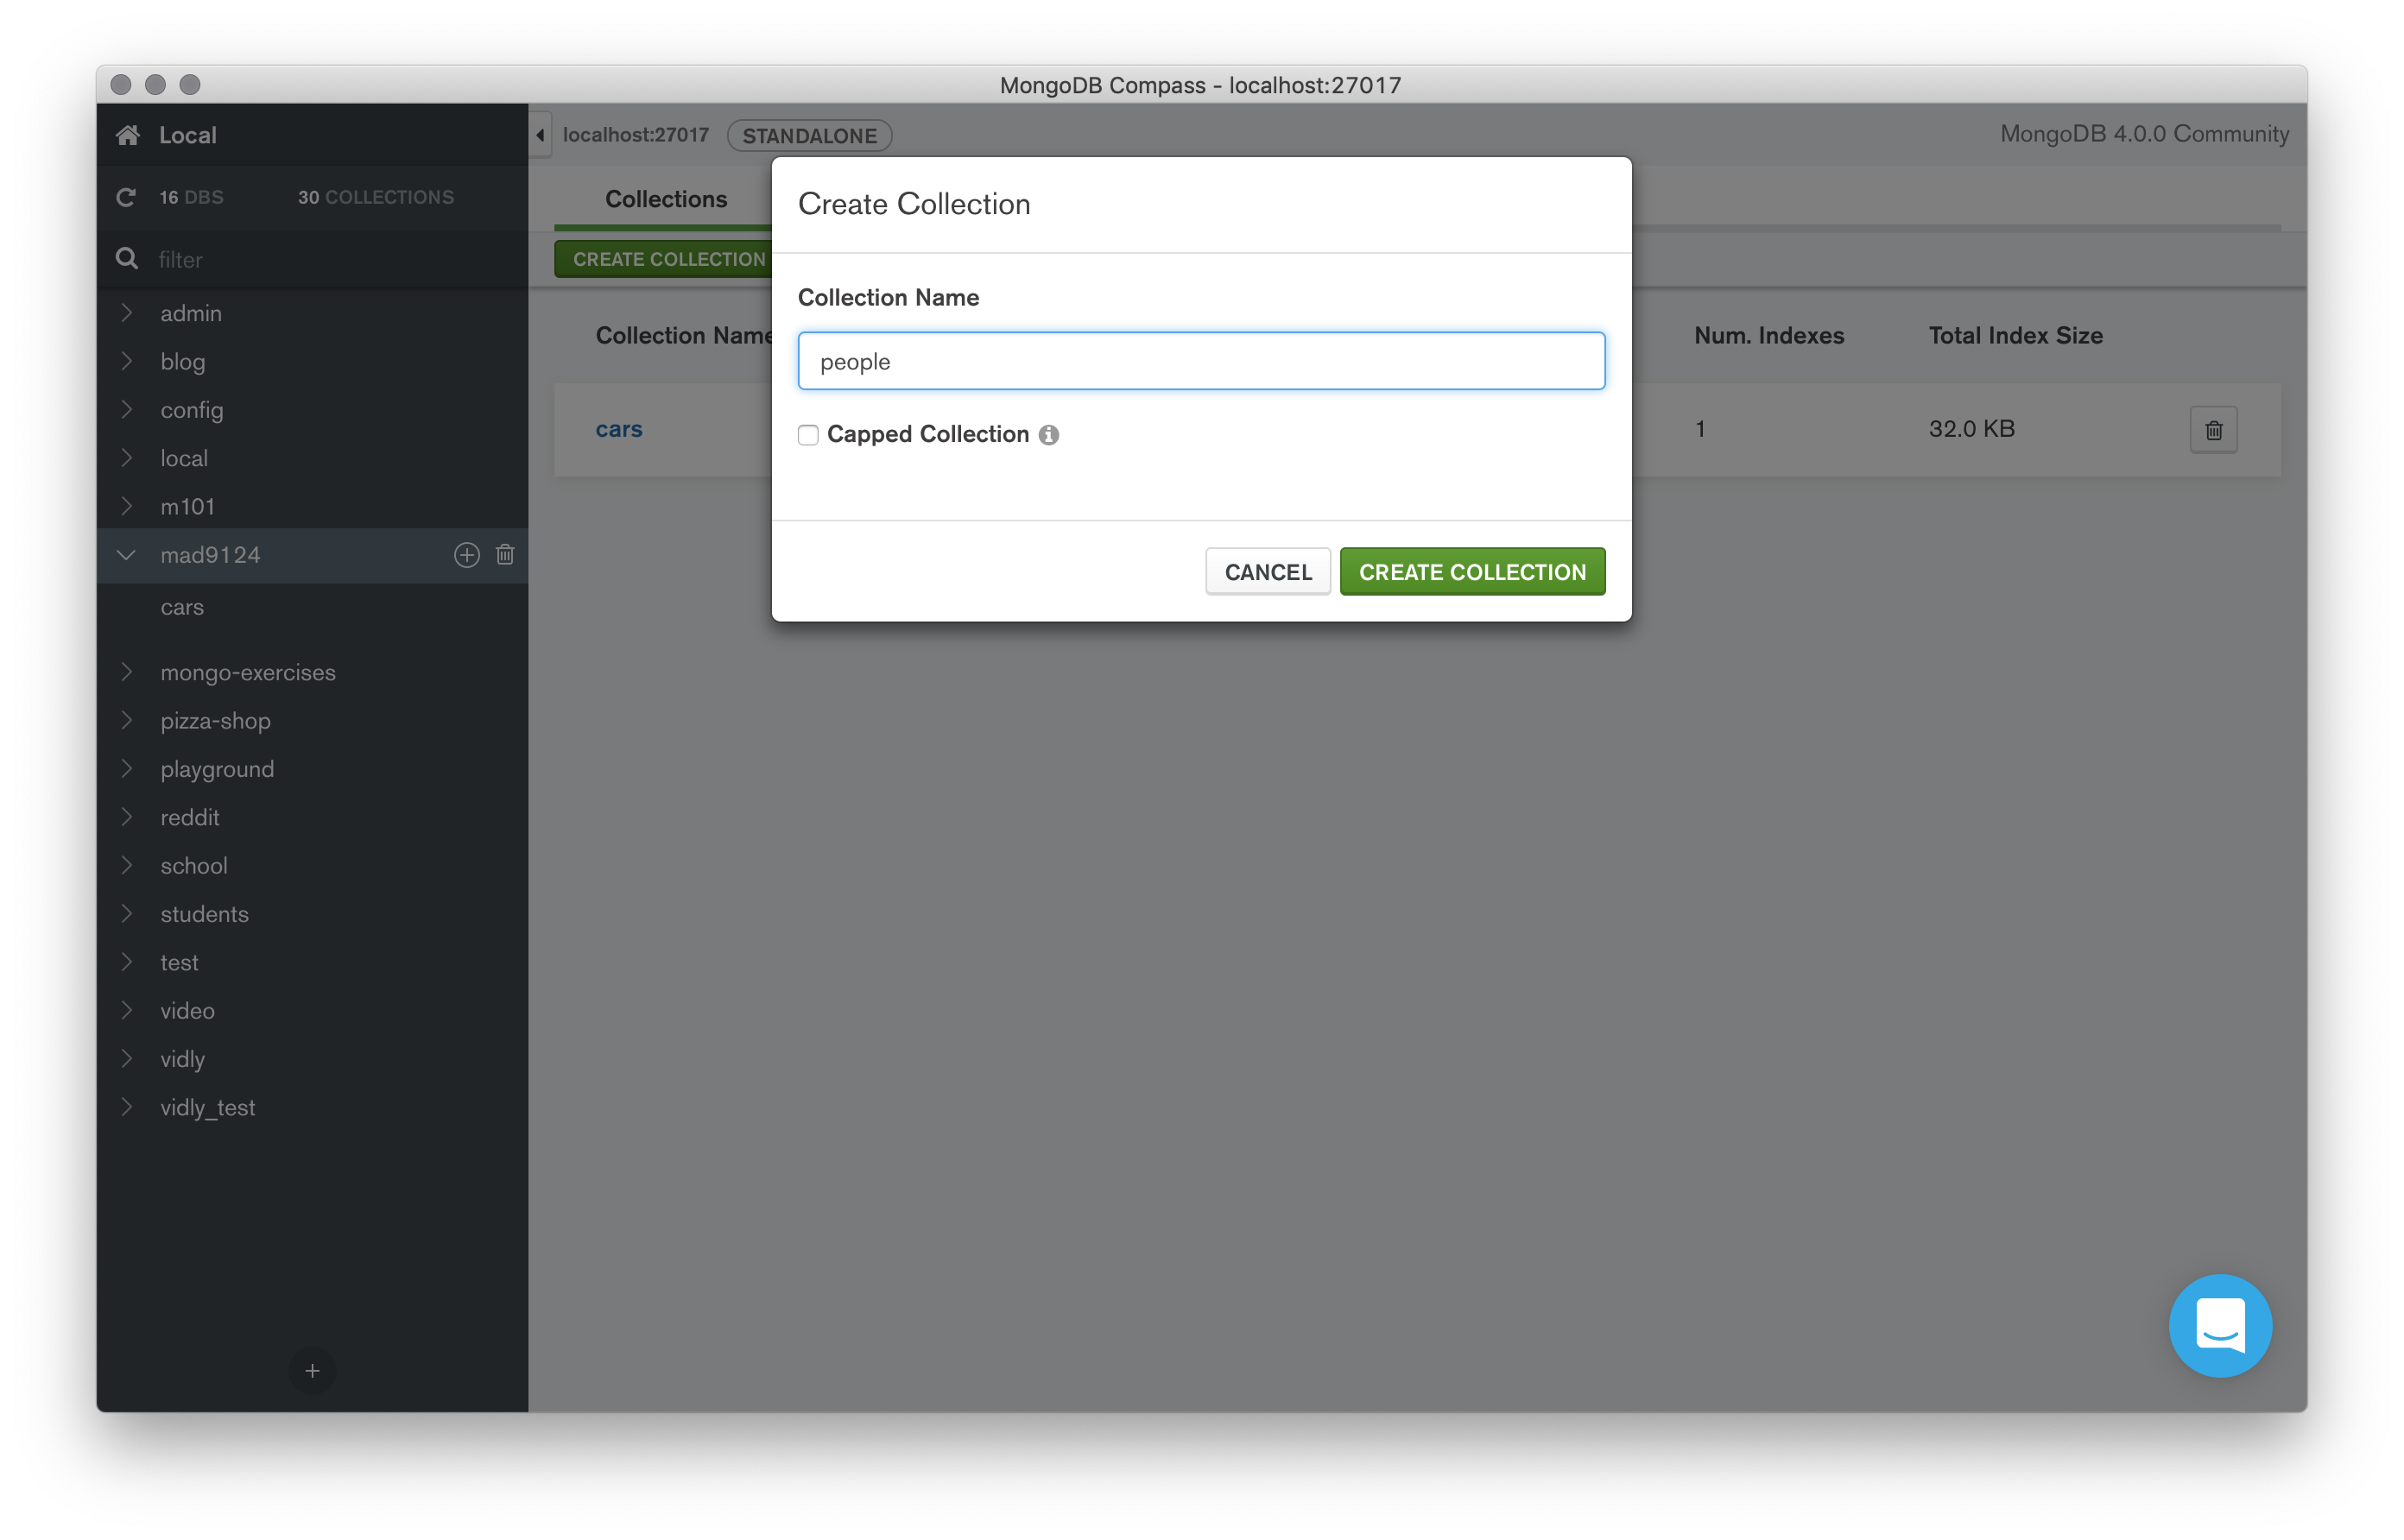
Create Collectionbutton. - Type the collection name as
people-- all lowercase. - Click the green
Create Collectionbutton.
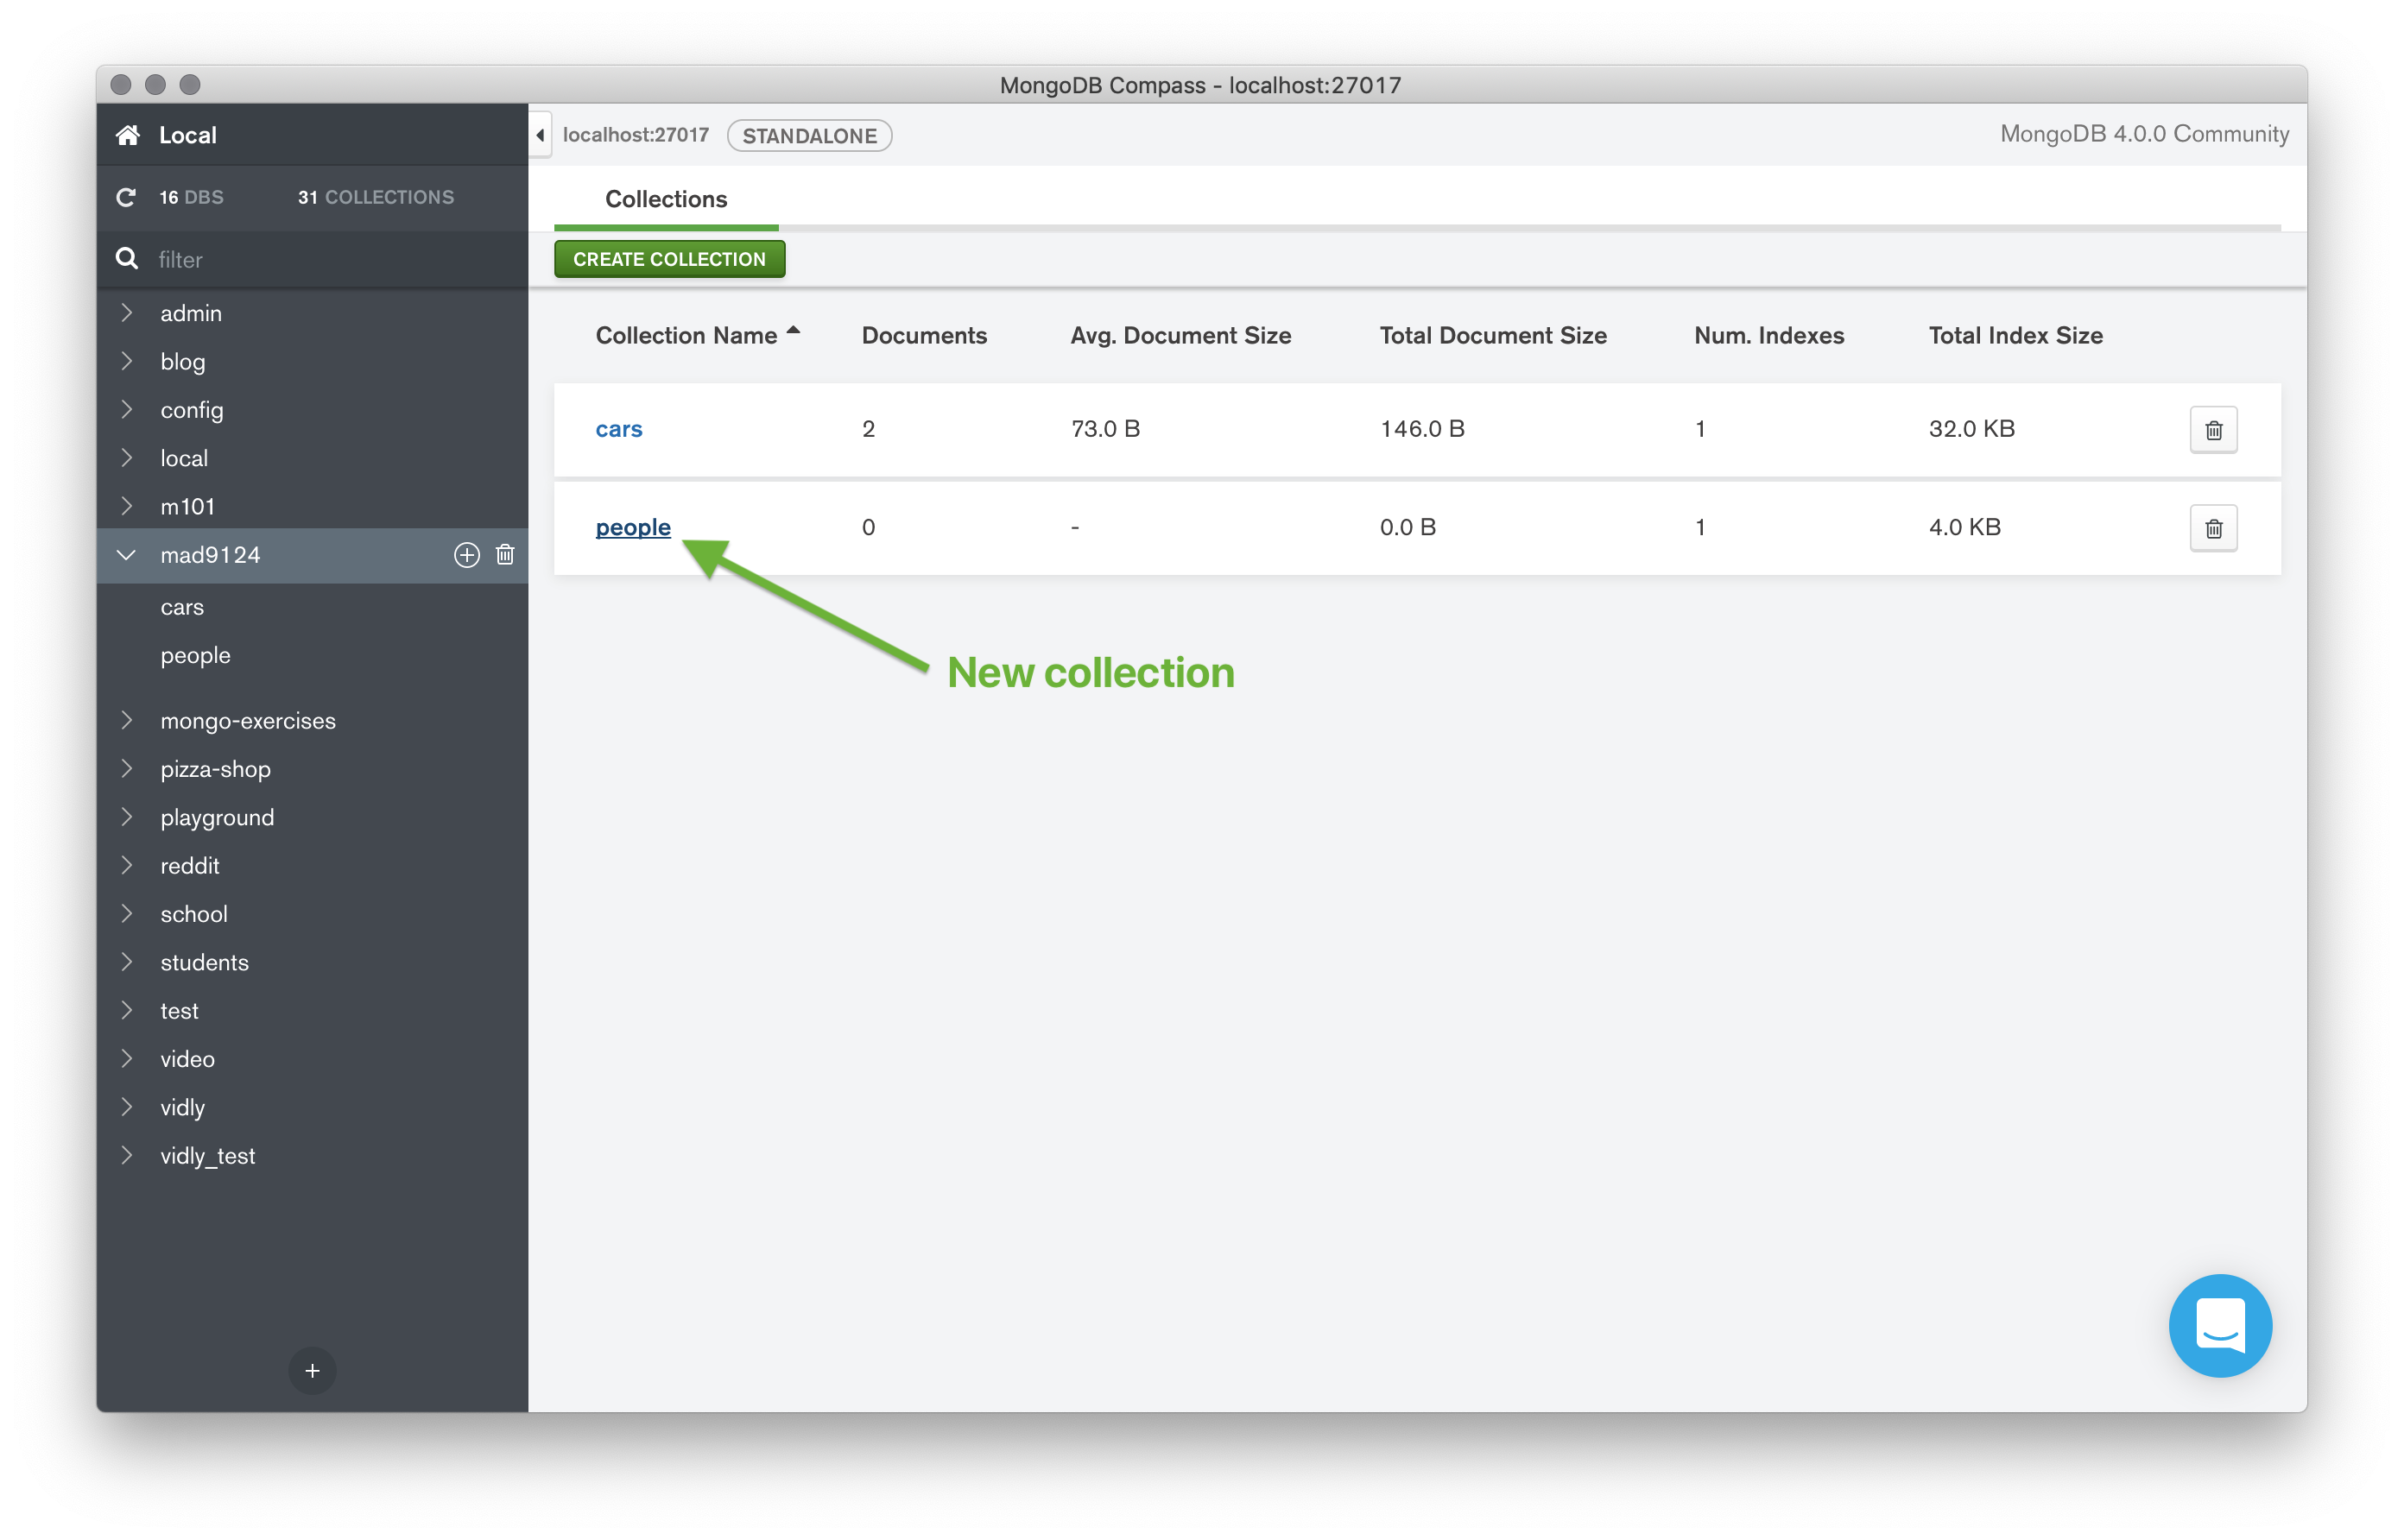
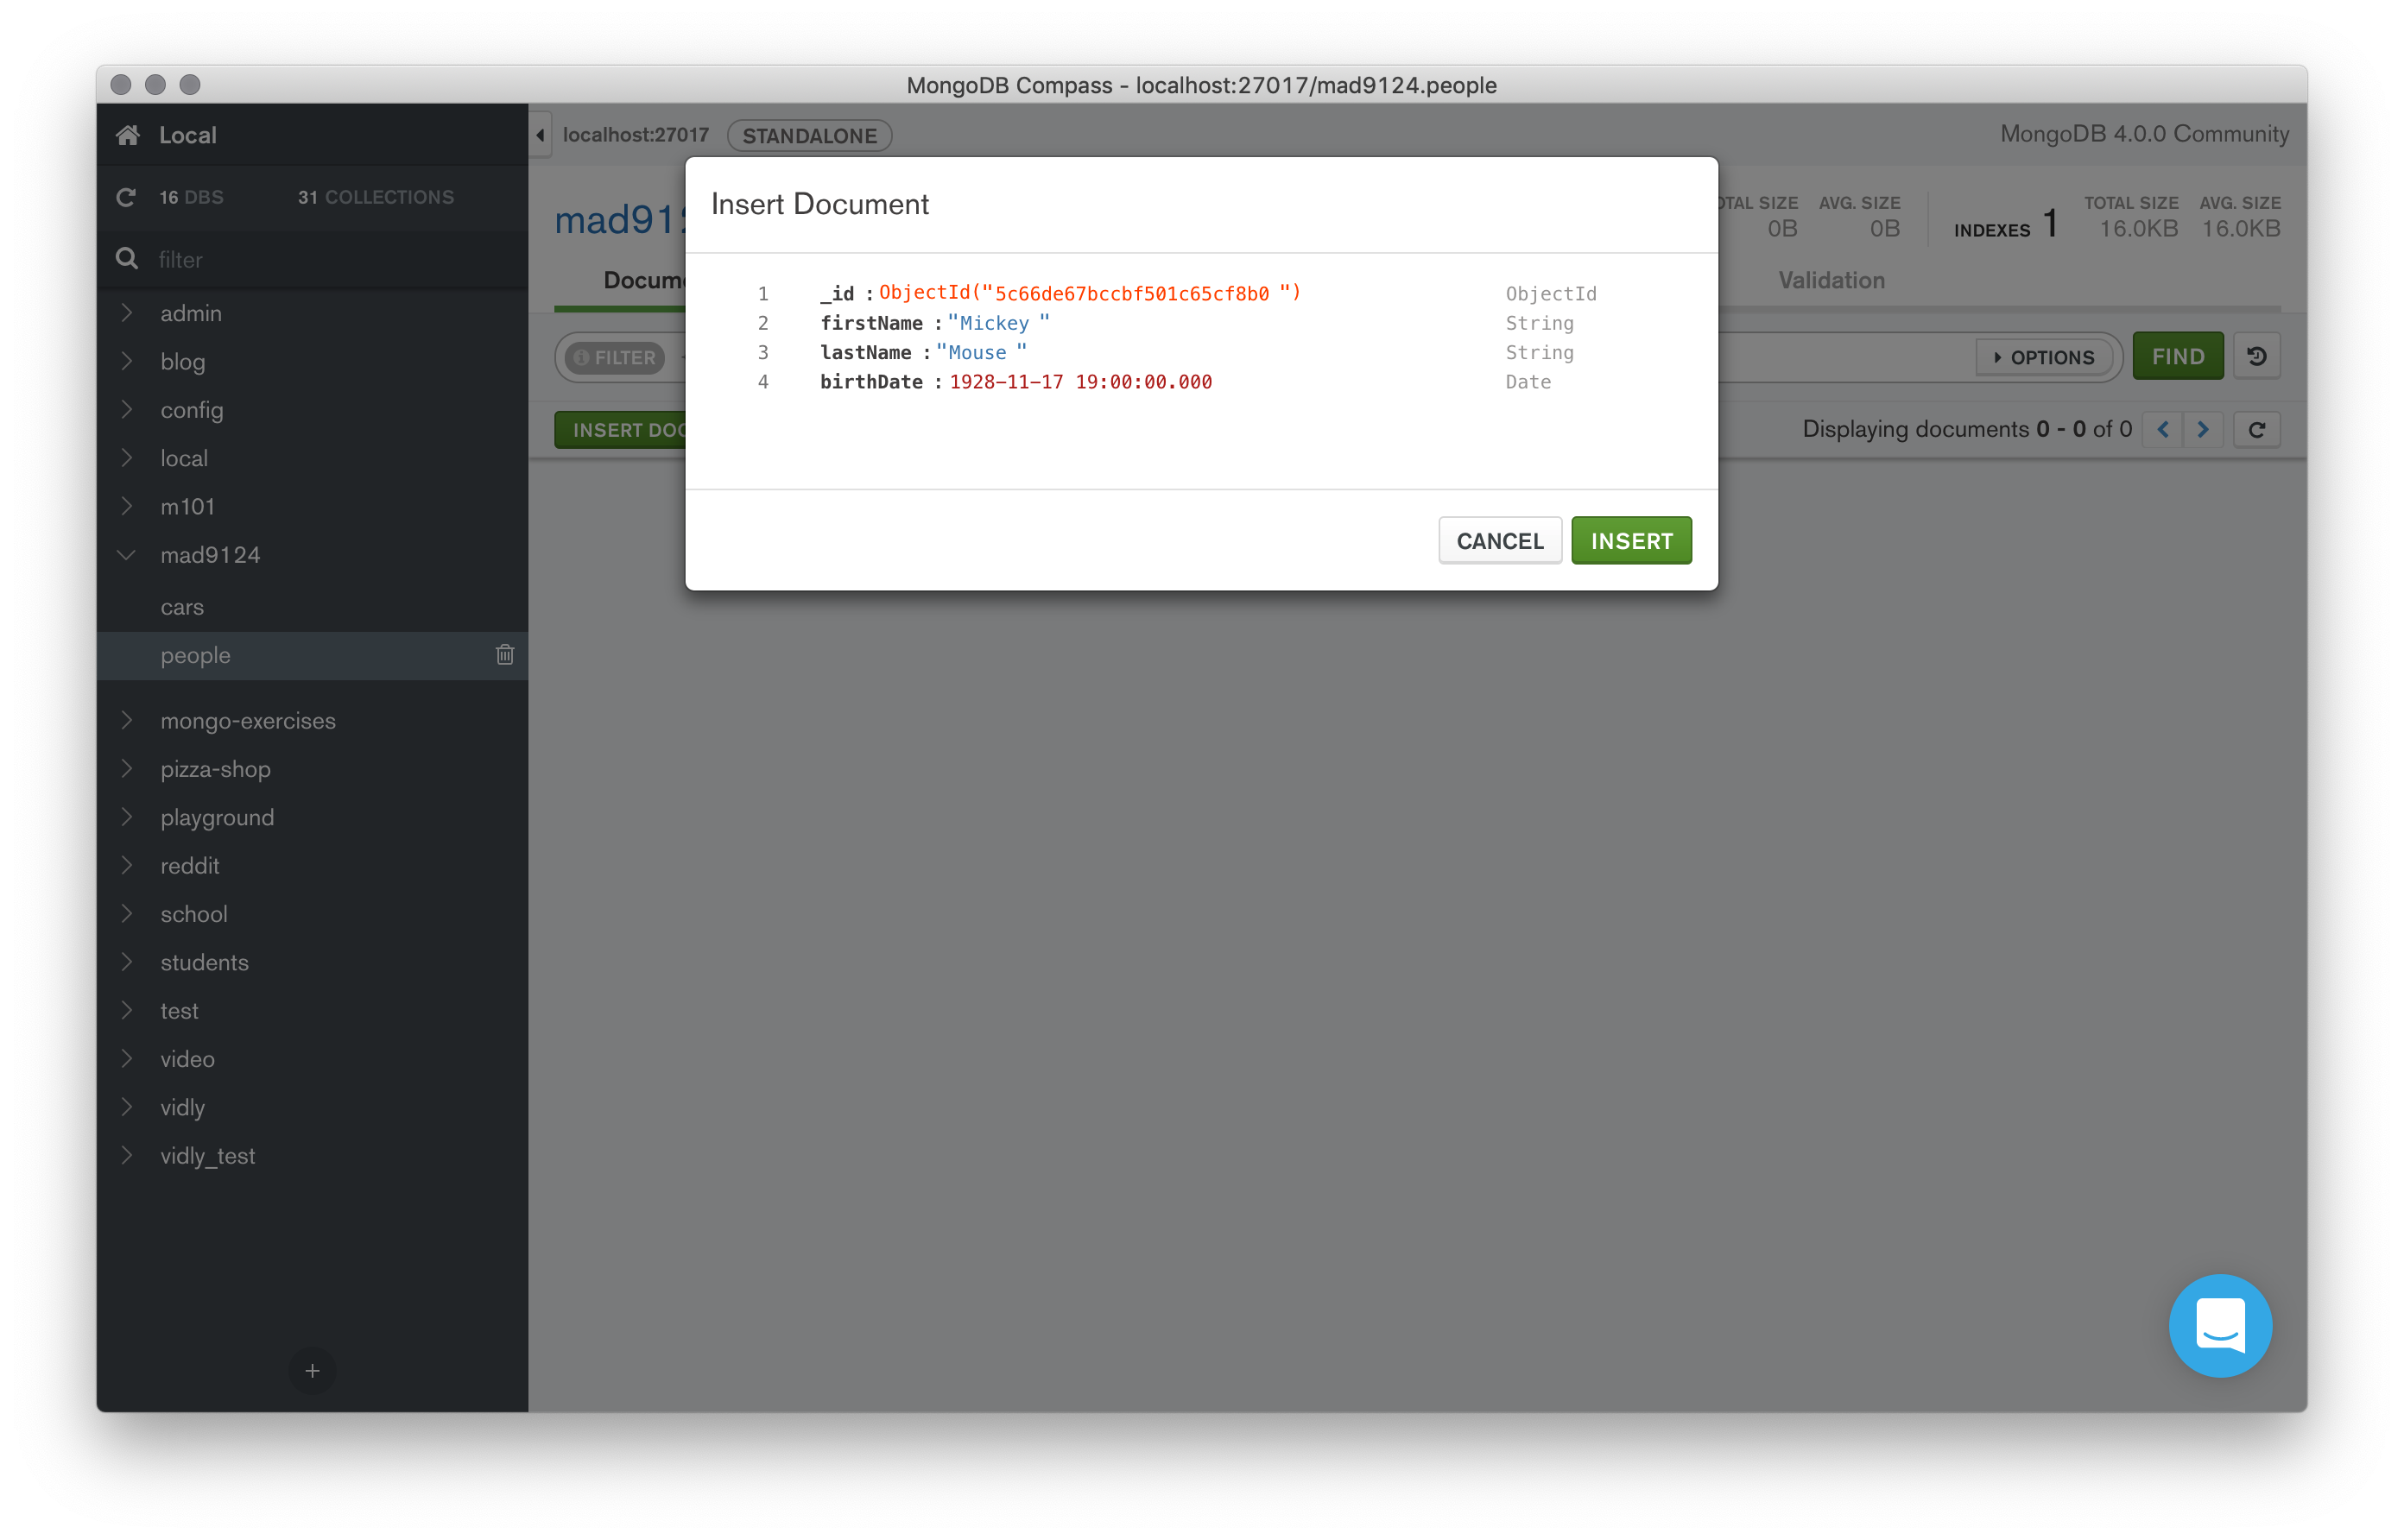
Manually add a Person document
- Click on the newly created
peoplecollection in the collection list. - Click on the green
Insert Documentbutton. - Add the properties and values for your Person document.
- Click the green
Insertbutton.
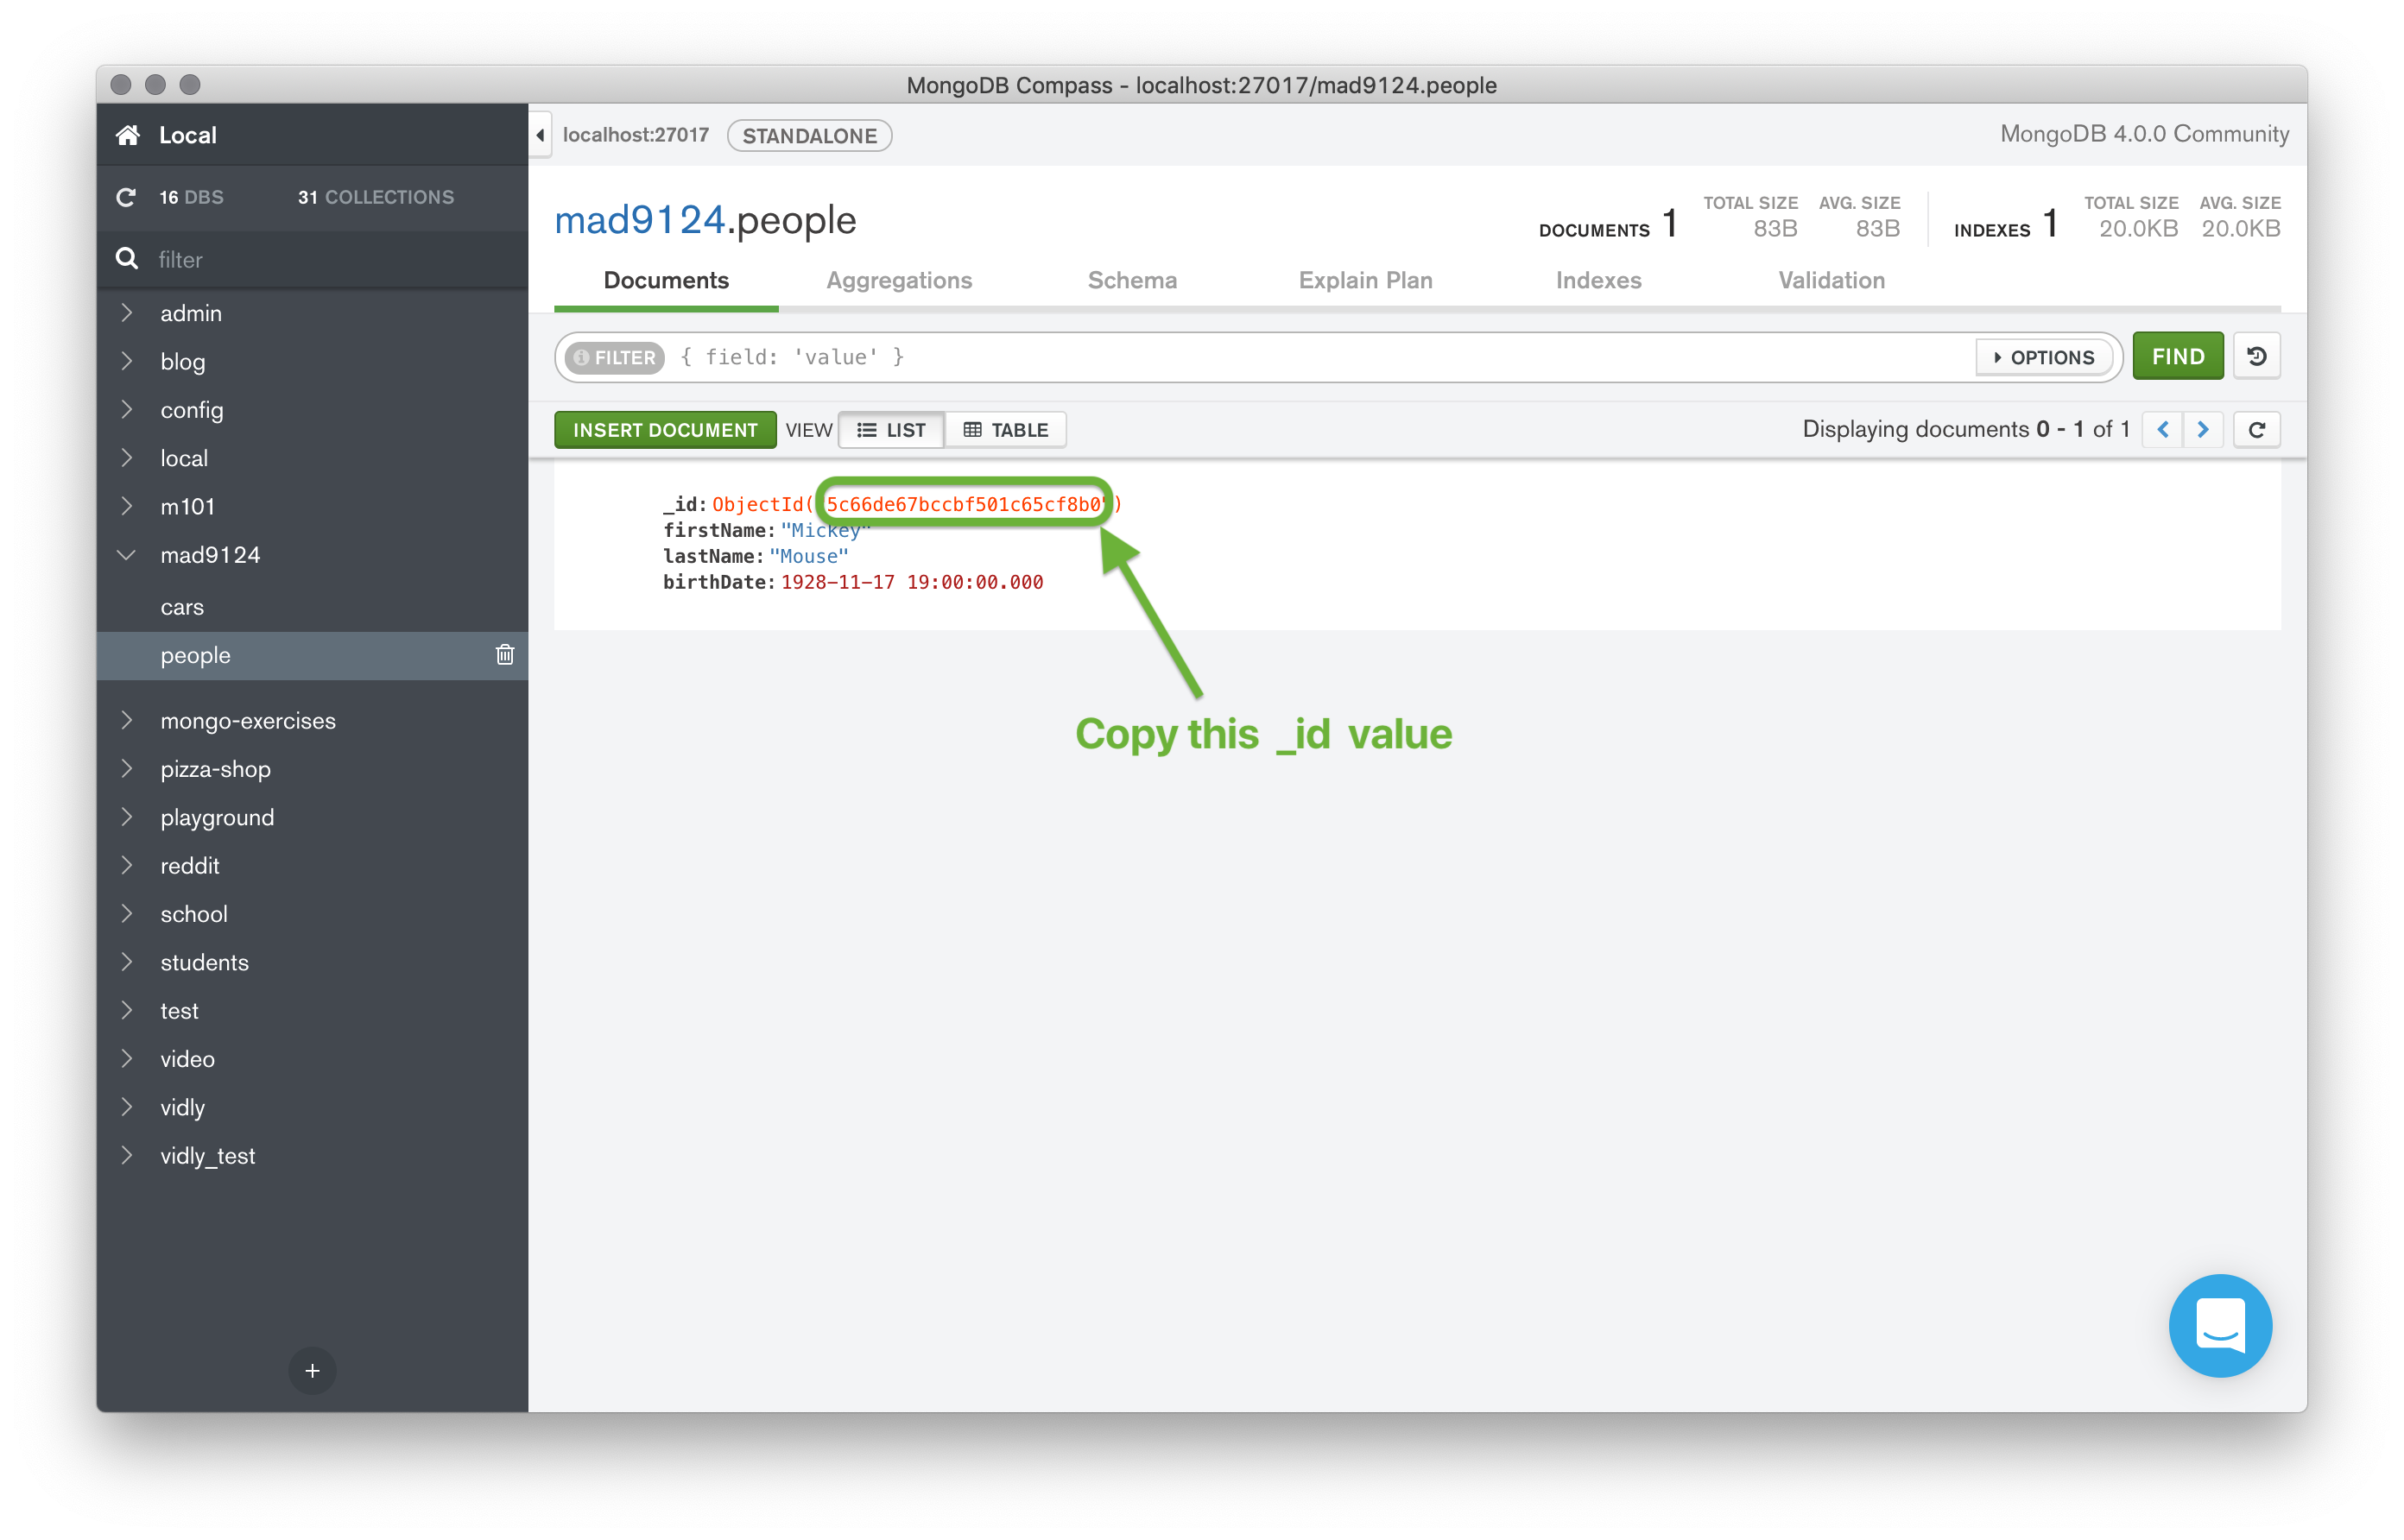
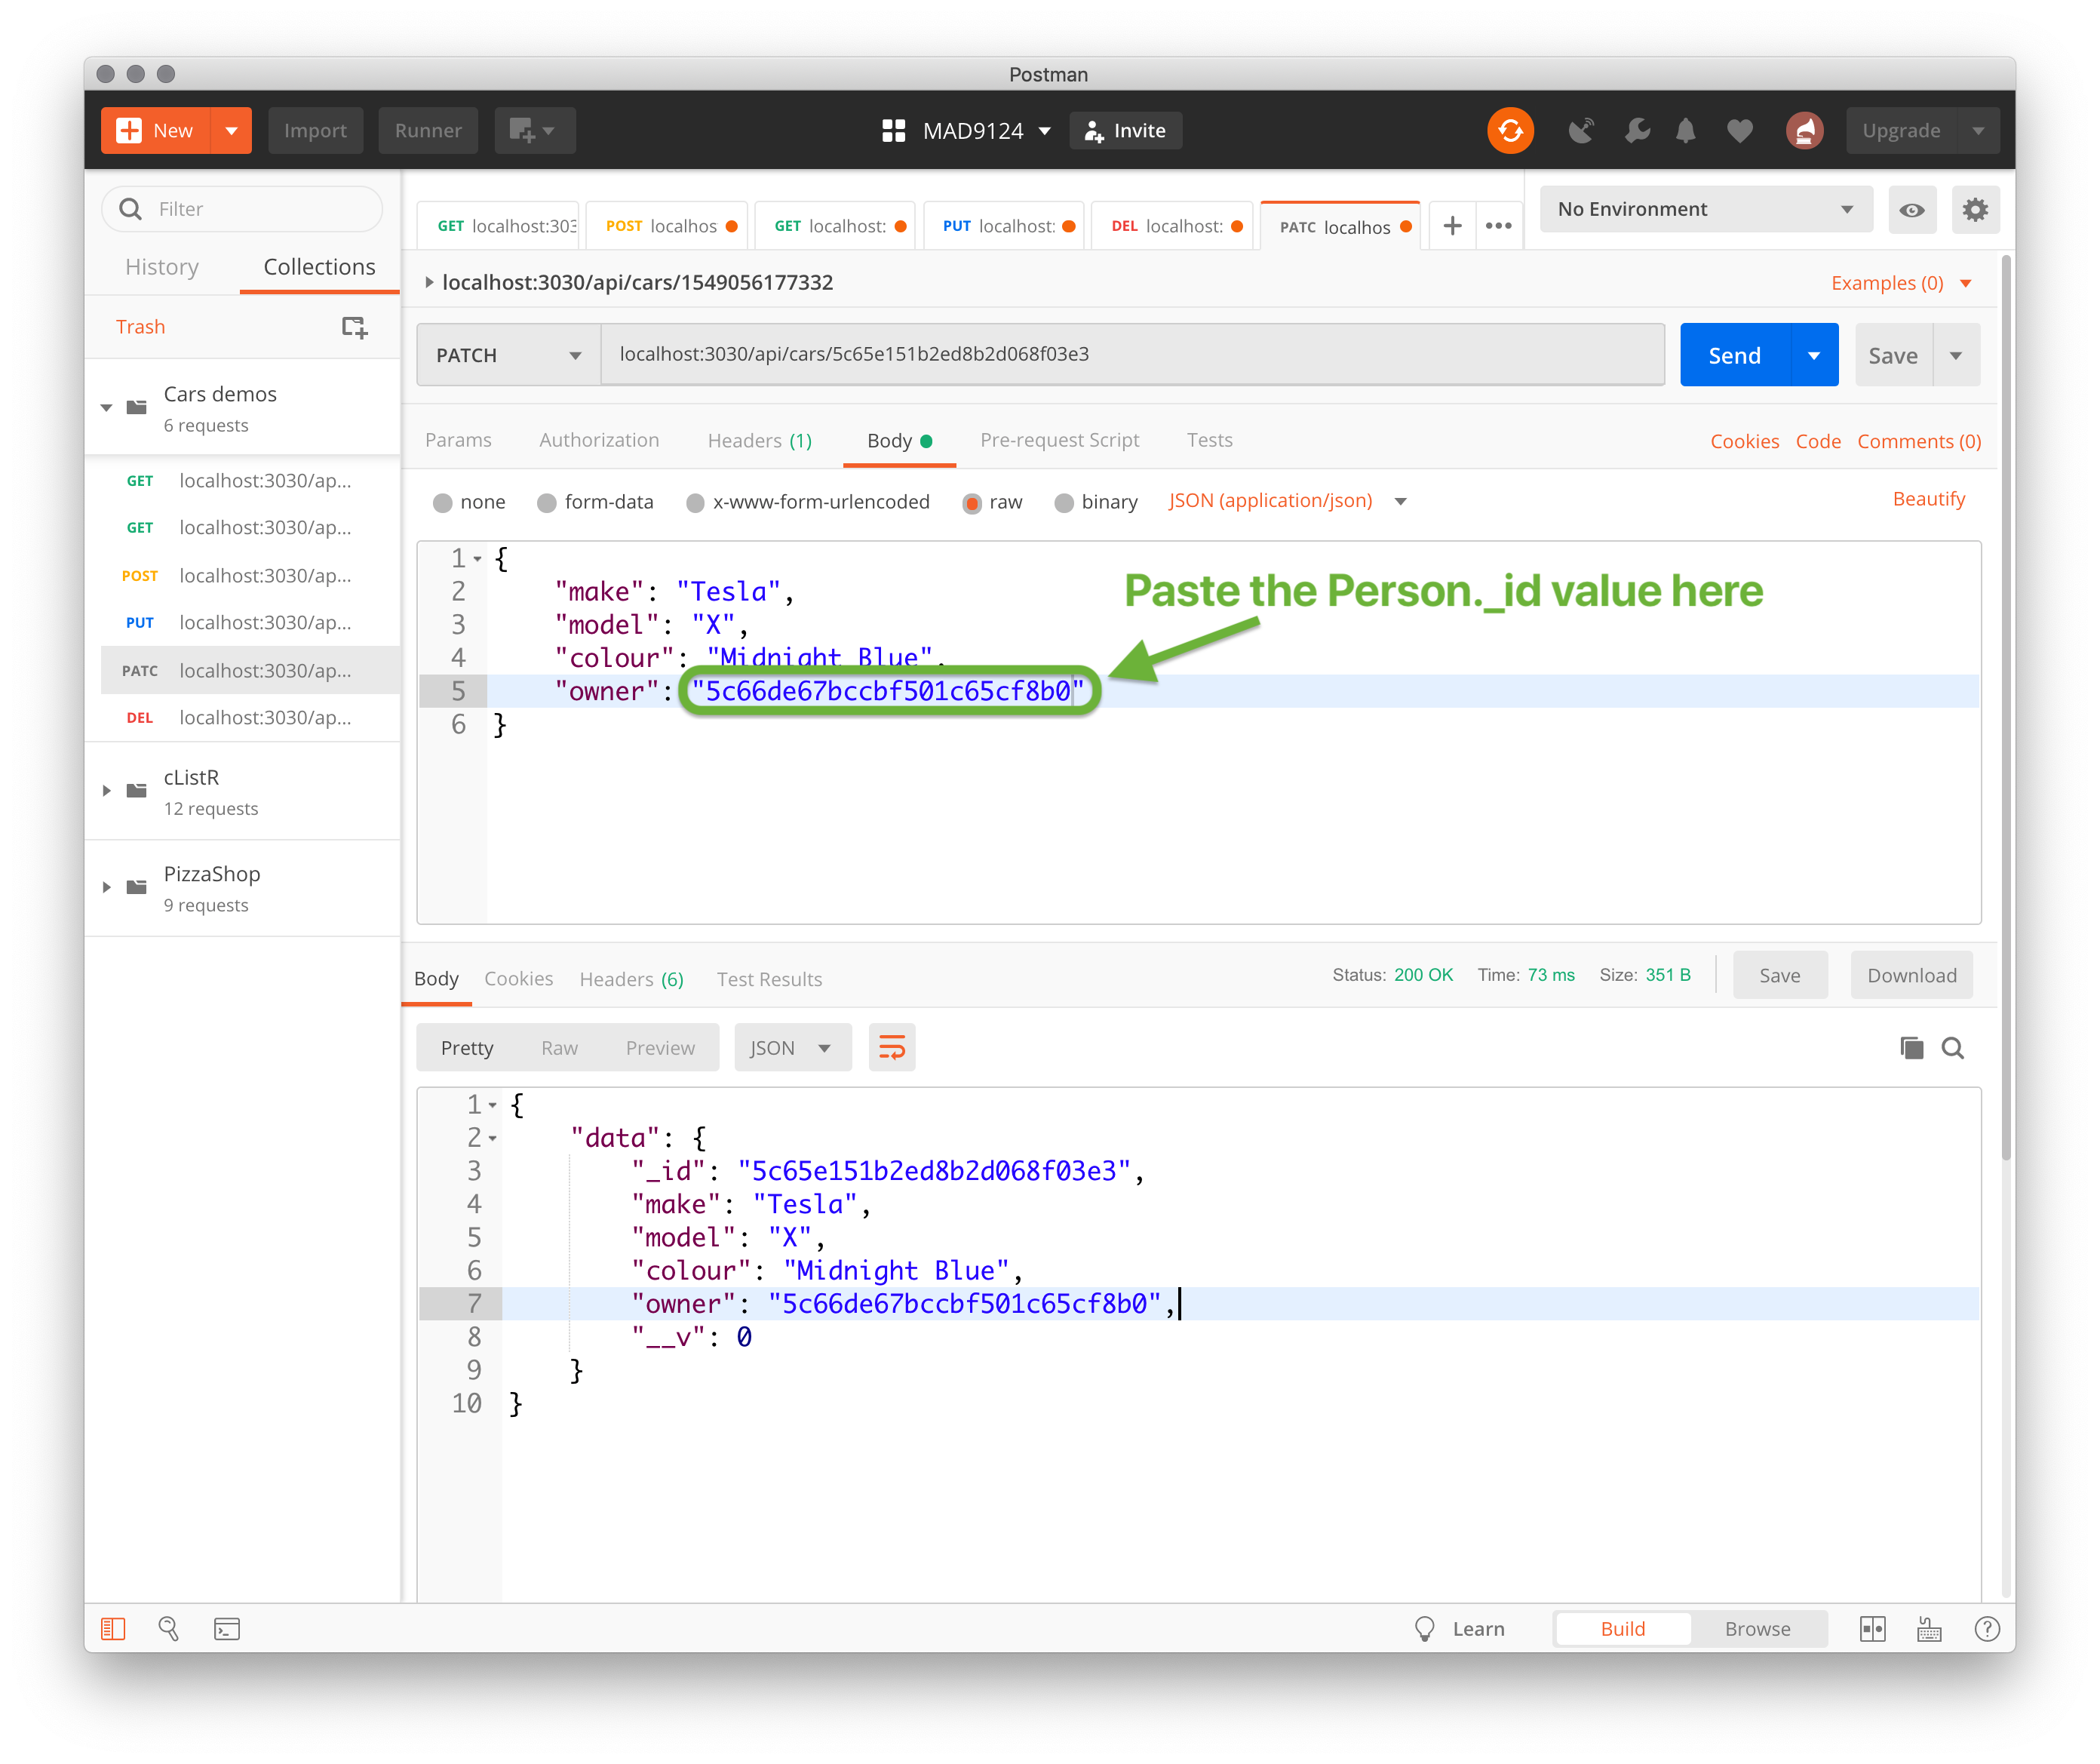
Update a Car document
Now that we have a Person in the database we can link that document as an owner reference in one of our Car documents. Use Postman to do a PATCH update on one of your Car documents with the _id value from your new Person document as the value for the owner property of the car.
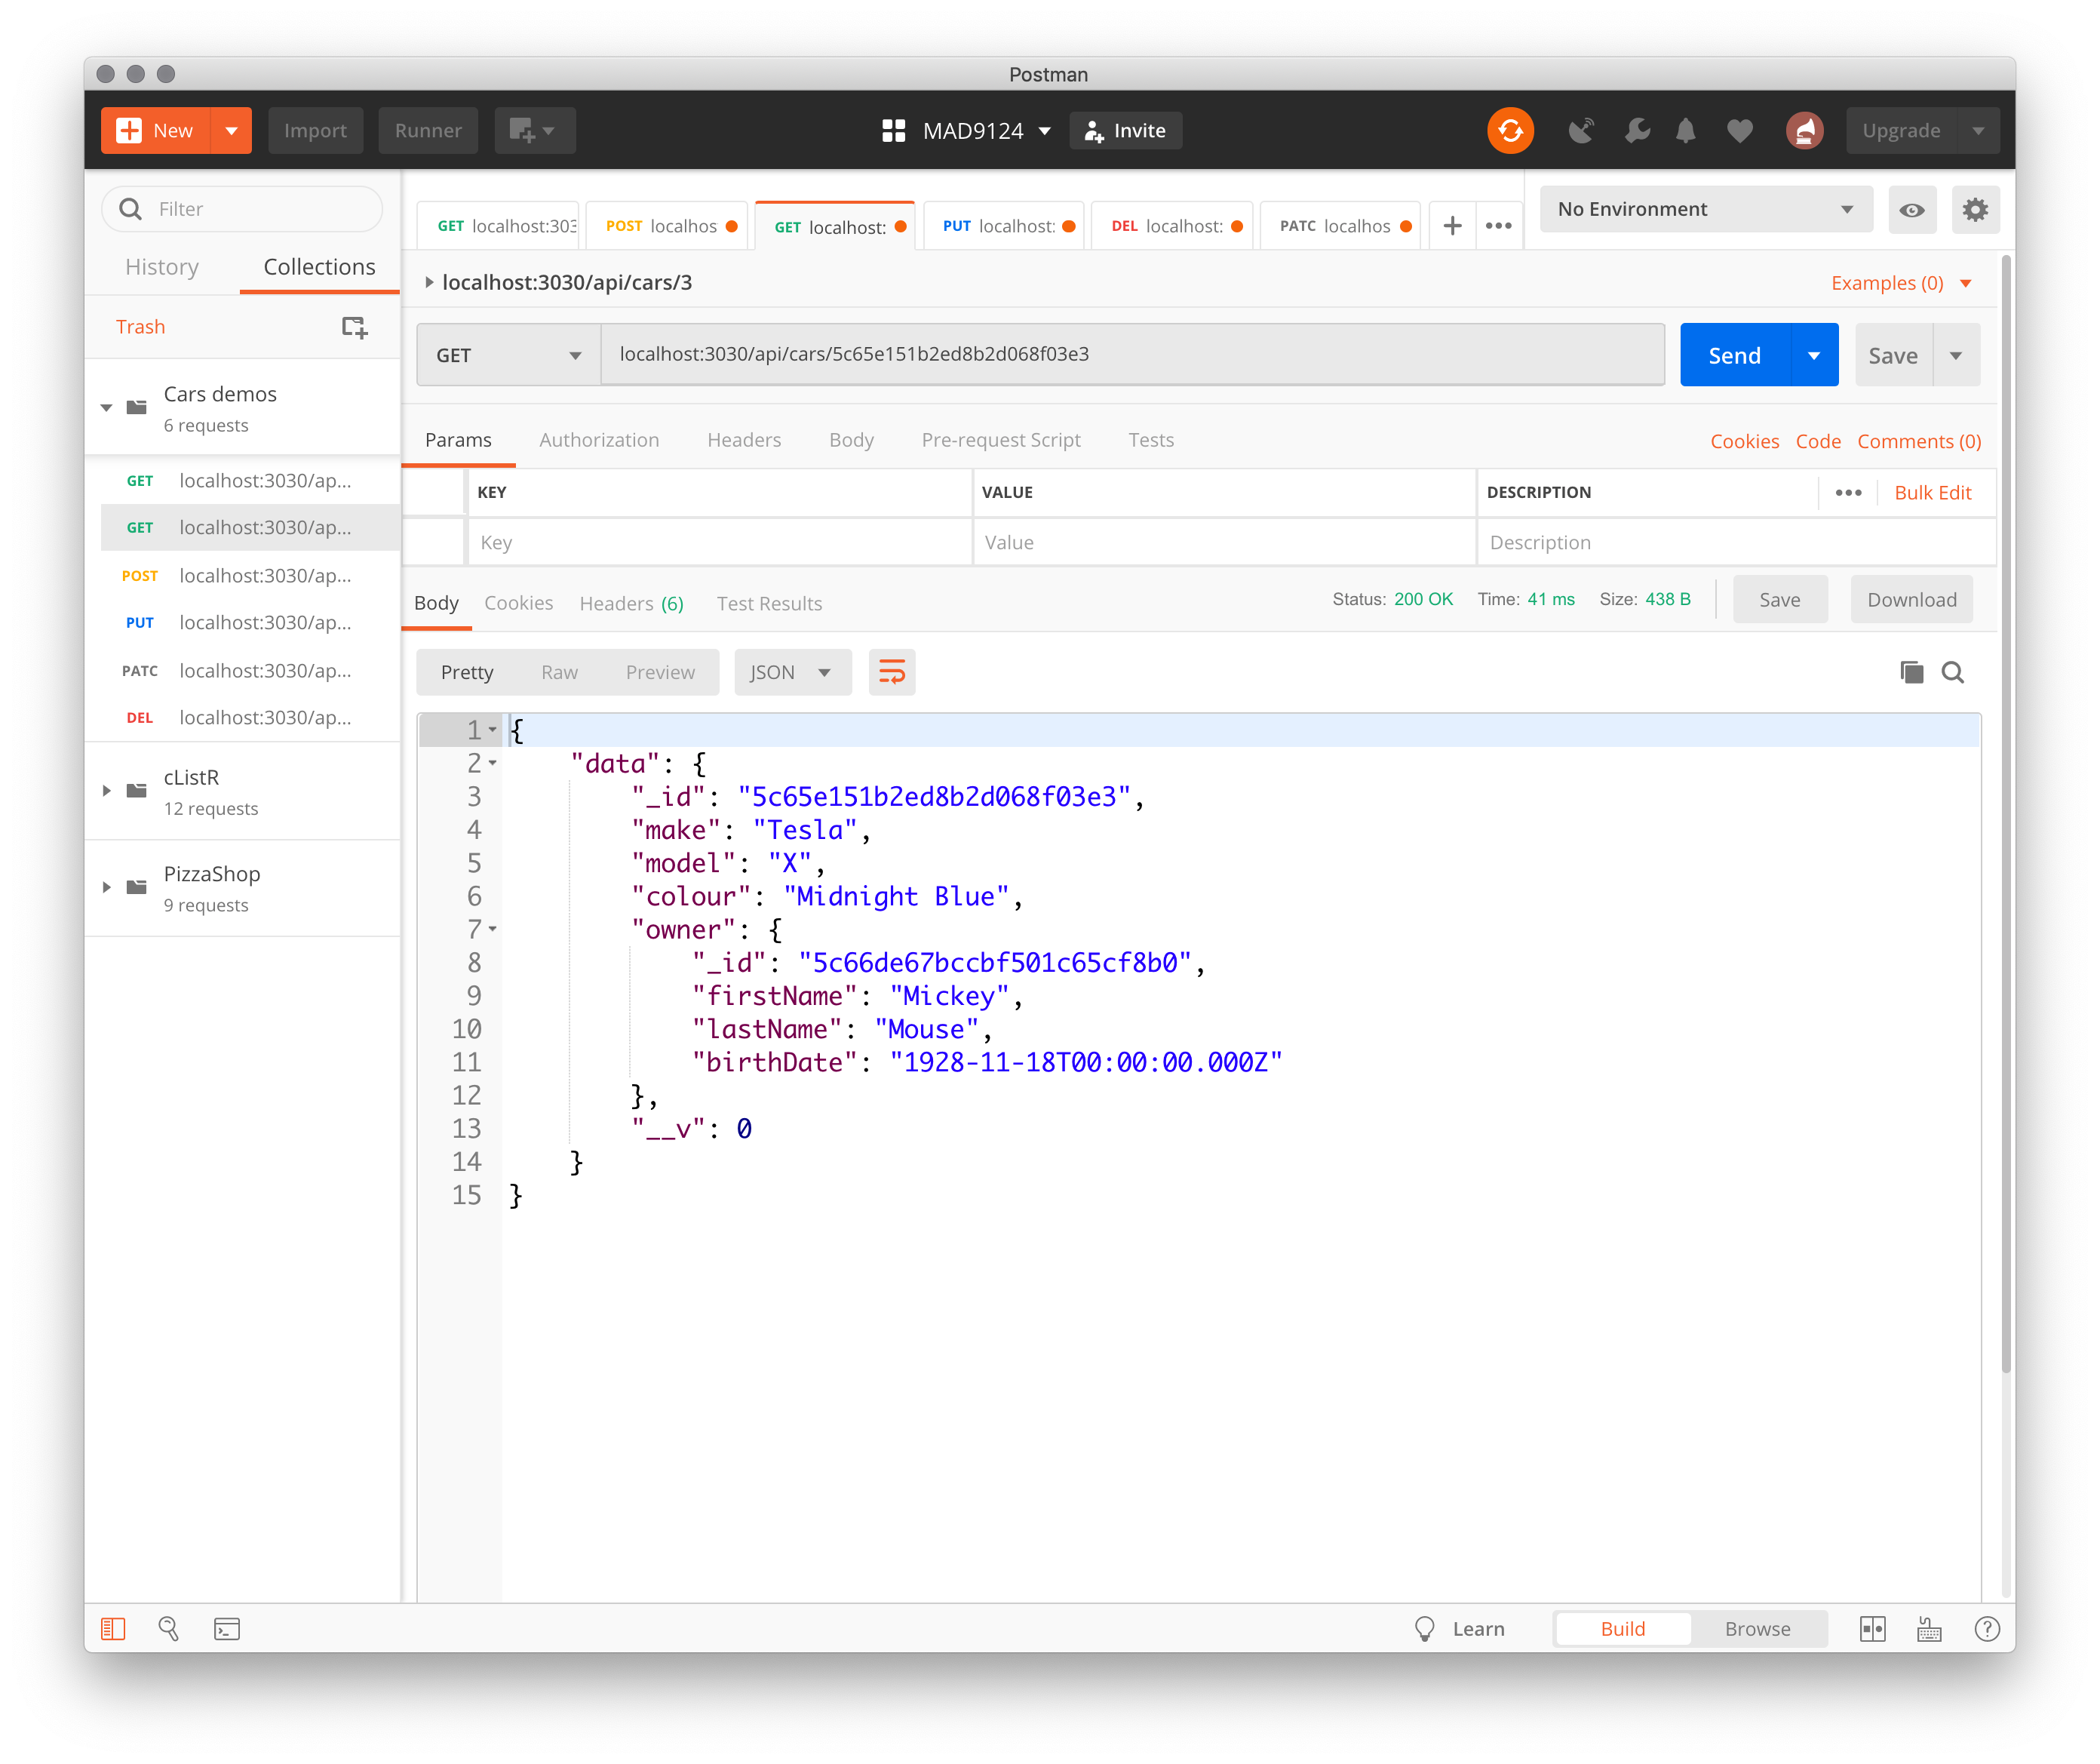
Test the GET /api/cars/:id route
Now that we have a Car document with an owner property linked to a Person document, we can finally test the .populate() instruction that we added to the GET /api/cars/:id route handler.
You should see the owner property has been expanded to include the entire related Person document.
People Router
Now that you have seen how to implement the cars router module. Use that as a template to implement the people router module on your own.
Create a new /routes/people.js file to implement a router module for the /api/people resource path. Be sure to require the Person model in your router module. Then register the router in the main app.js file.
Test all of the routes with Postman.
Submit GitHub Repo
Create a new private repo on GitHub named mad9124-ex6-userid (please substitute your college userid. i.e. mine would look like mad9124-ex6-mckennr).
Make sure that you have initialized your local project folder with git init and created a .gitignore file to exclude the node_modules folder and the .DS_Store files from your git archive.
Create a commit to include all of your work from today's exercises.
Link the local repo to the GitHub repo and sync them up.
Remember to add me as a collaborator on your GitHub repo so that I can see your code, and submit the GitHub repo's URL on Brightspace.
For next class
Before next class, please read these additional online resources.