Week 3
Application Architecture and RESTful APIs
Quiz 2: Node Modules 20 mins
There will be a quiz today. It will be worth 2% of your final grade.
Agenda
- AMA (15 min)
- Quiz (20 min)
- Break (10 min)
- Application Architecture (20 min)
- RESTful Web Services (10 min)
- RESTful Express (10 min)
- CRUD Routes
- Route Parameters
- Testing with POSTMAN
- Break (10 min)
- EX3-1 Express CRUD
Application Architecture
Web services, web APIs, REST APIs, RESTful web APIs ... what does it all mean?
What is an API?
An application program interface (API) is code that allows two software programs to communicate with each other. The API defines the correct way for a developer to write a program that requests services from an operating system (OS) or other application. APIs are implemented by function calls composed of verbs and nouns. The required syntax is described in the documentation of the application being called.
An Application Programming Interface (API) is often thought of as a contract that describes a predictable method of accessing the data or functions implemented by another program or module. The shape of the data provided and the function signatures remain constant, even if the underlying implementation changes.
What is a Web Service?
A web service is a software architectural pattern that exposes an API for remotely manipulating collections of resources via the stateless HTTP communications protocol.
Definition from Wikipedia
In a web service, the Web technology such as HTTP—originally designed for human-to-machine communication—is utilized for machine-to-machine communication, more specifically for transferring machine-readable file formats such as XML and JSON.
In practice, a web service commonly provides an object-oriented web-based interface to a database server, utilized for example by another web server, or by a mobile app, that provides a user interface to the end user.
Client-Server Architecture
Web service are built on the broader client server architectural pattern which has a long history going back to the development of ARPANET in late 1960s. The core premise is that the responsibilities for various aspects of an application are separated, with some running on the client computers and some running on the centralized server. Clients could be desktop applications, native mobile applications, web applications, or hybrid applications.
The main benefits to this architectural model have changed over time, but it is still the prevailing choice for building modern applications. In the context of mobile application development, this allows for a single source of truth - meaning that no matter how many clients are using our application, the data is stored in one place and we will have data consistency across all clients.
The typical division of responsibilities has the client manage the presentation of data, user interaction events and navigation. The server is responsible for authentication, data validation and storage.
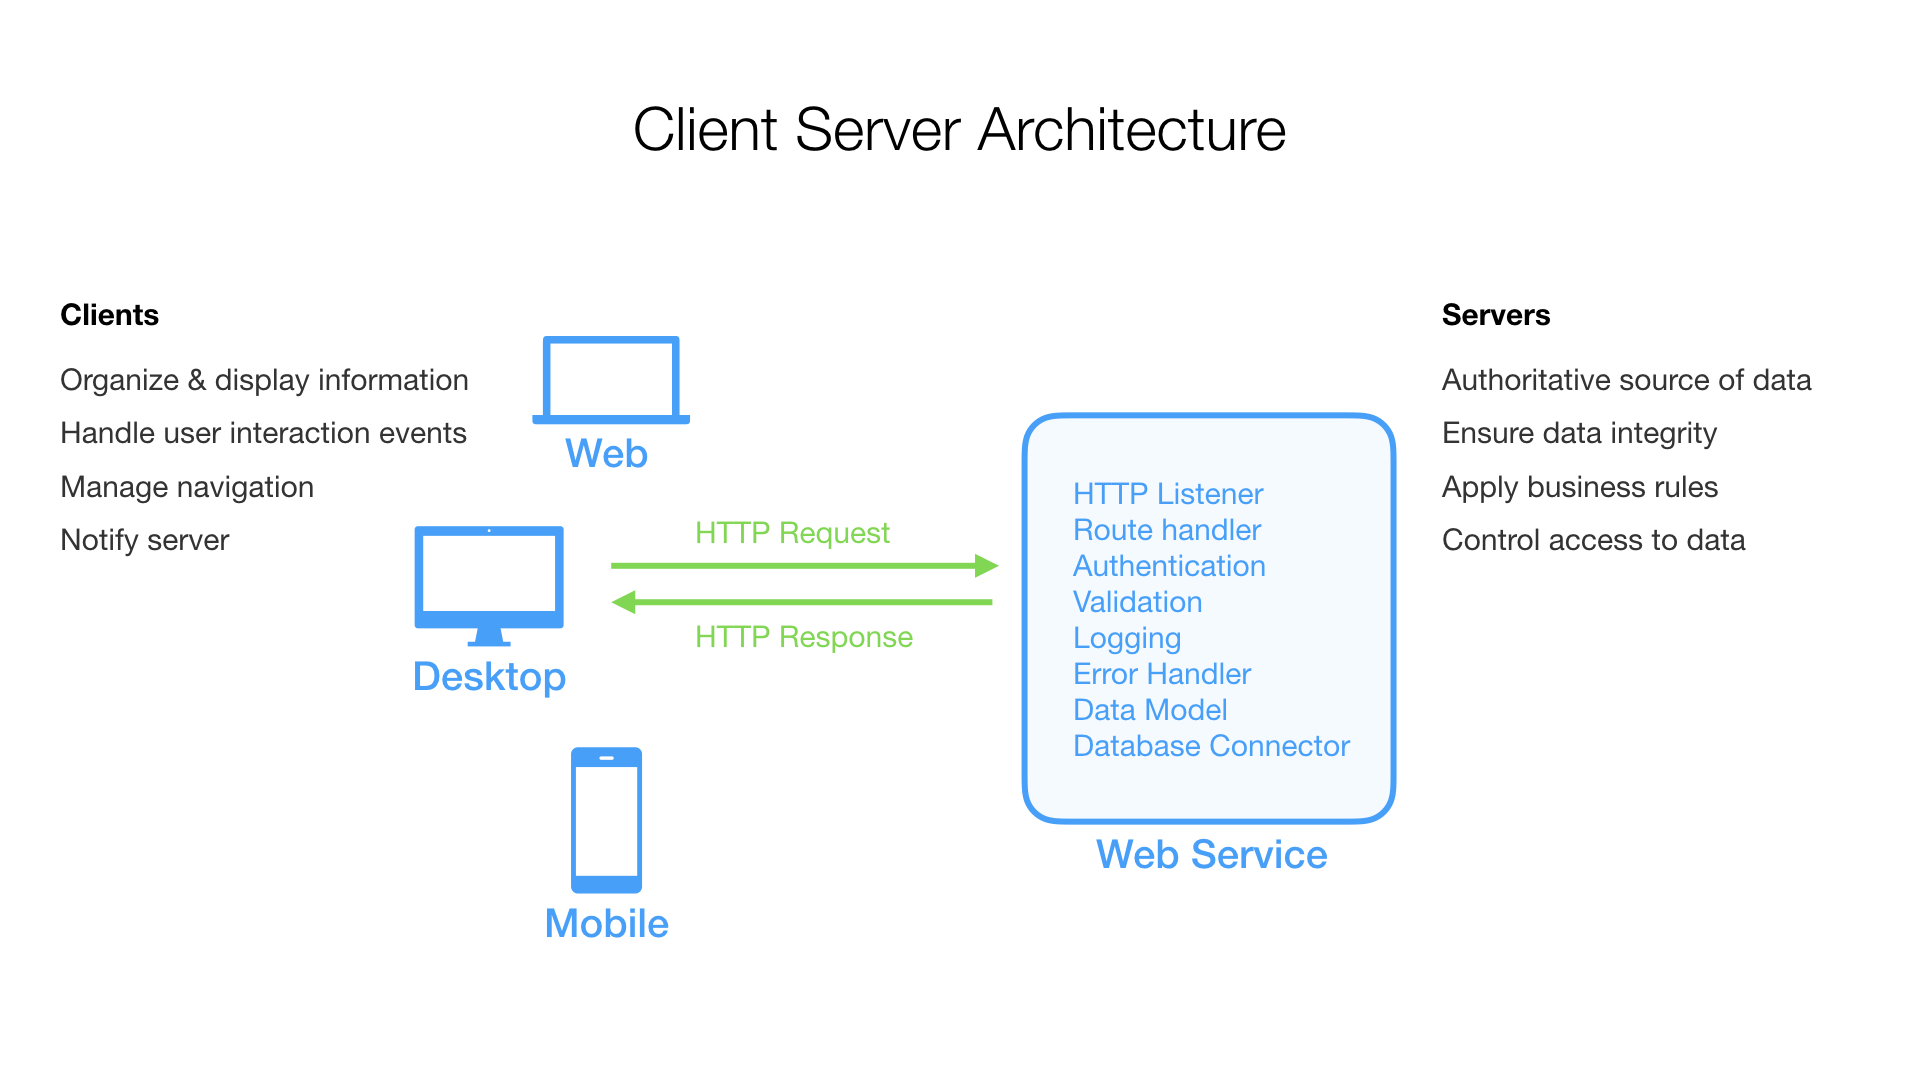
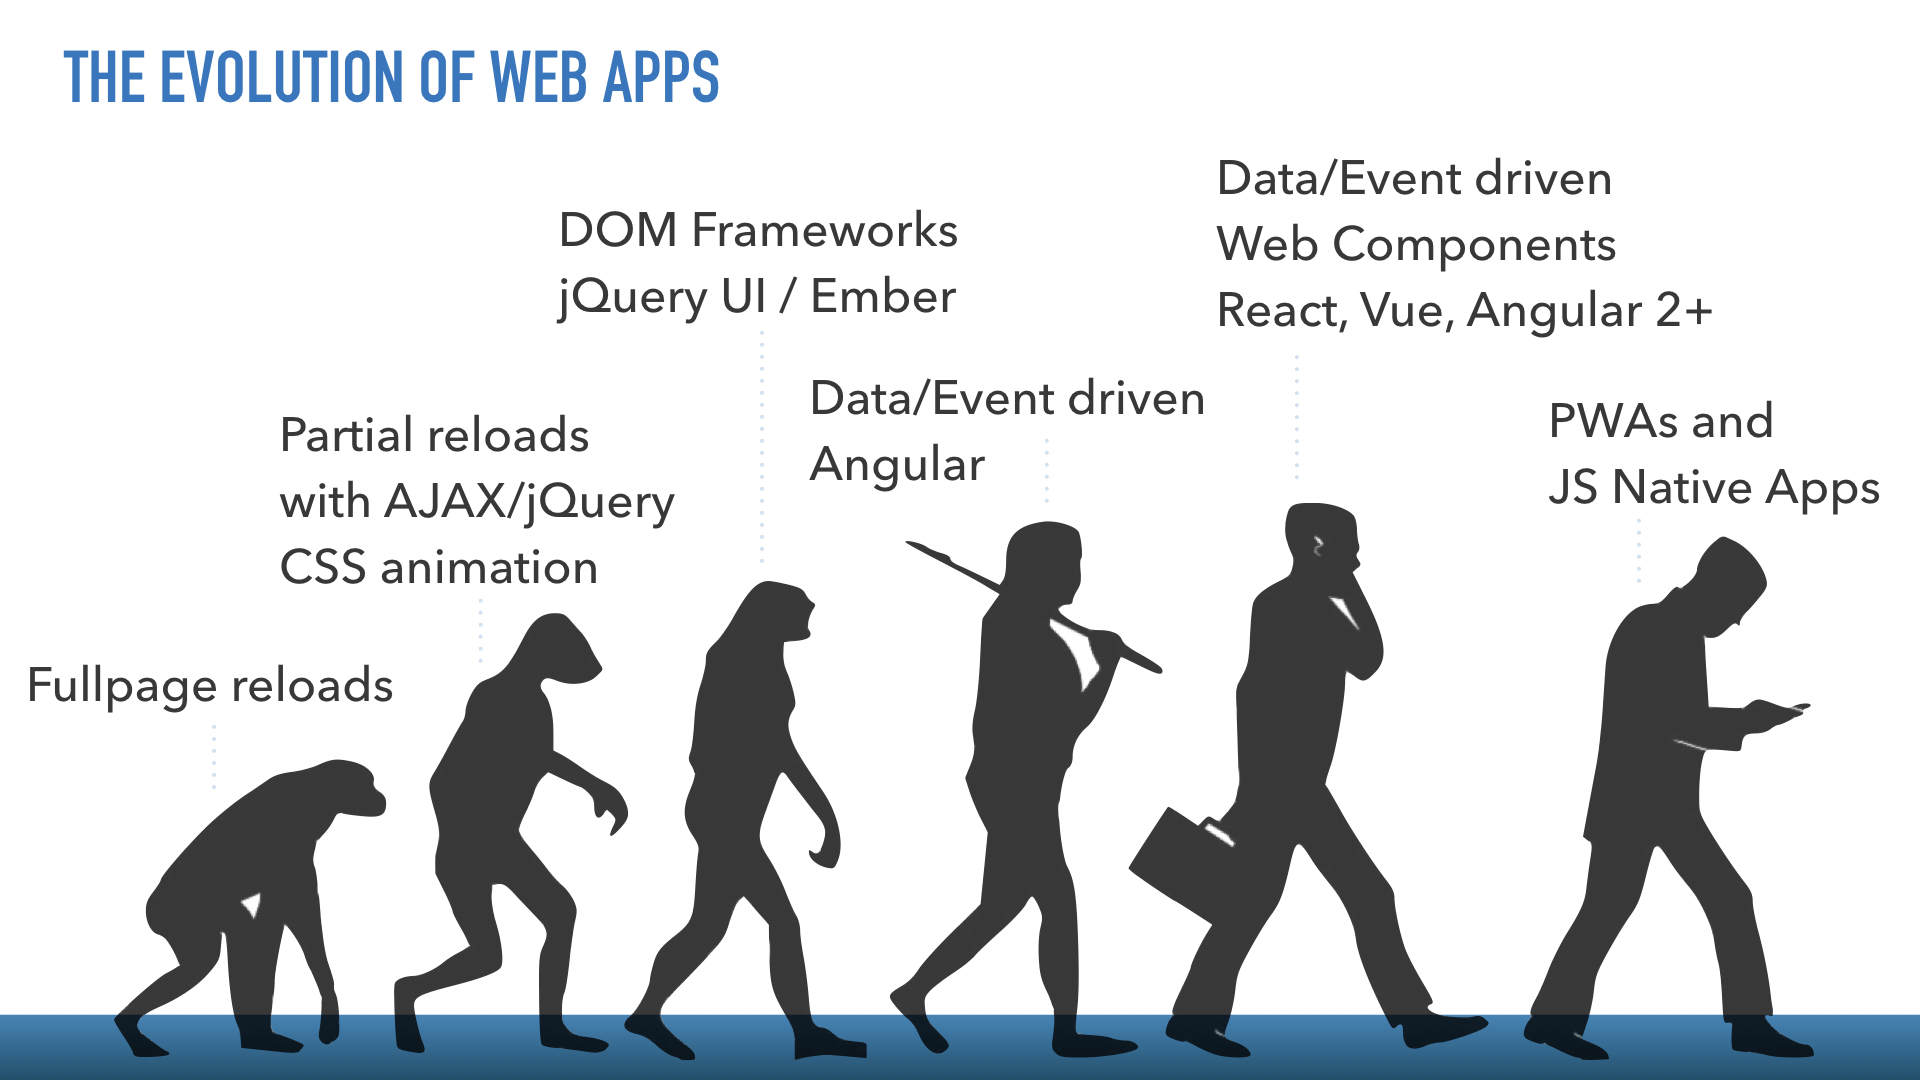
How much application logic resides on the client v.s. the server has shifted over time, with the trend toward pushing more application logic out to the client.
MVC Design Pattern
There are many design patterns for building an application in the client-server architectural style. The most common for web and mobile apps is the Model View Controller (MVC) pattern and it derivatives such as Model View View-model (MVVM).
Organizing our code in this way allows us to break the application problem space down into smaller chunks each with specific areas of responsibility. This makes it easier to reason about our code and automate testing.
The MVC pattern divides responsibilities along these lines ...
Model: data objects
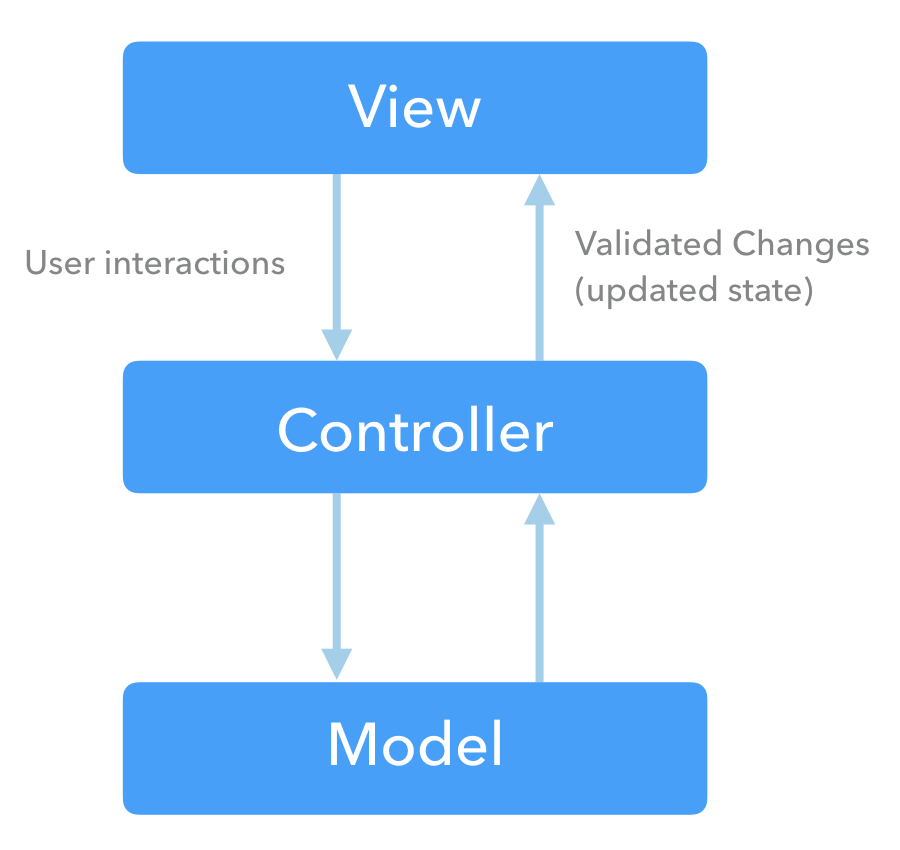
Model classes define the data shape (what properties an object has) and the business rules that affect data validation and behavioural capabilities. They also manage the object instance life cycle - the persistence and retrieval of data from a permanent storage location such as a database.
Controller: data request handling
These modules are the traffic cops of our applications. They define the route handlers for a web service's API endpoints. They will be responsible for ensuring that the user is authorized to make the request and that any data passed meets the validation requirements, before invoking the appropriate Model modules.
Controller modules are also responsible for correctly formatting the response data payload.
View: user interface / presentation
View components receive response data from the controller modules and manage the display of that data in the user interface. They also respond to user interaction events and collect any new or updated data that needs to be forwarded to the controller for processing.
TIP
This course will focus on building the Model and Controller elements of the MCV pattern.
Clean code
As we build out our in-class examples and assignments throughout the remainder of this course. I will try to exemplify some of the 'Clean Code' best practice recommendations, with a particular focus on naming rules, function rules, comment rules and code structure.
Code is clean if it can be understood easily – by everyone on the team. Clean code can be read and enhanced by a developer other than its original author. With understandability comes readability, changeability, extensibility and maintainability.
Lessons learnt from “Clean Code” — Robert C. Martin
Summary of 'Clean code' by Robert C. Martin
Uncle Bob Martin has written many books over the years - not all of them an easy read, but Clean code : a handbook of agile software craftsmanship (available in the Algonquin College Library) should be on every professional developer's (re)reading list. As you progress through your career, you will get new insights from revisiting this text.
RESTful Web Services
History of REST
The REST architectural style was created by Roy Fielding in parallel with the development of the HTTP v1.1 protocol from 1996 - 1999. Fielding outlined the principles and constraints of a RESTfull web service in his PhD dissertation published in 2000.
OK, we know what an API is and that web services are a way to expose an API over the internet using the same protocols as web browsers. So, what about RESTful APIs or RESTful web services?
RESTful web services are web services that follow the Representational State Transfer (REST) architectural style by exposing an API that defines all actions with respect to a given resource URI organized to correspond to one of the standard C.R.U.D. operations mapped to the HTTP verbs.
Let's unpack that into smaller pieces, starting with a review of some helpful definitions.
Definitions
- REST: Representational state transfer
- JSON: JavaScript Object Notation
- Resource: A class of data objects
- Resource Path: The path portion of the URI
- Endpoint: The full URI including the path
- Route: The combination of the resource path and the HTTP verb
- CRUD: Create, Read, Update, Delete
Resource / Data Model
A core concept in this API design pattern is creating representational data models to define the properties and methods for discrete object components in an application. We refer to these objects as resources or collections of resources.
Suppose that we were building an attendance tracking application. As we think about the problem, two obvious object types (or resources) come to mind:
- students
- classes
Our application would need to keep track of these objects and how they related to each other. We will dig into this topic in more detail in weeks 5 and 6.
API Endpoint
Because we will be using HTTP to act on these resources, we typically construct our URIs using the collective noun form of each resource type as the path. If our fictional application were hosted with the hostname api on the domain name attendance.io, the URI for the students collection resource would be
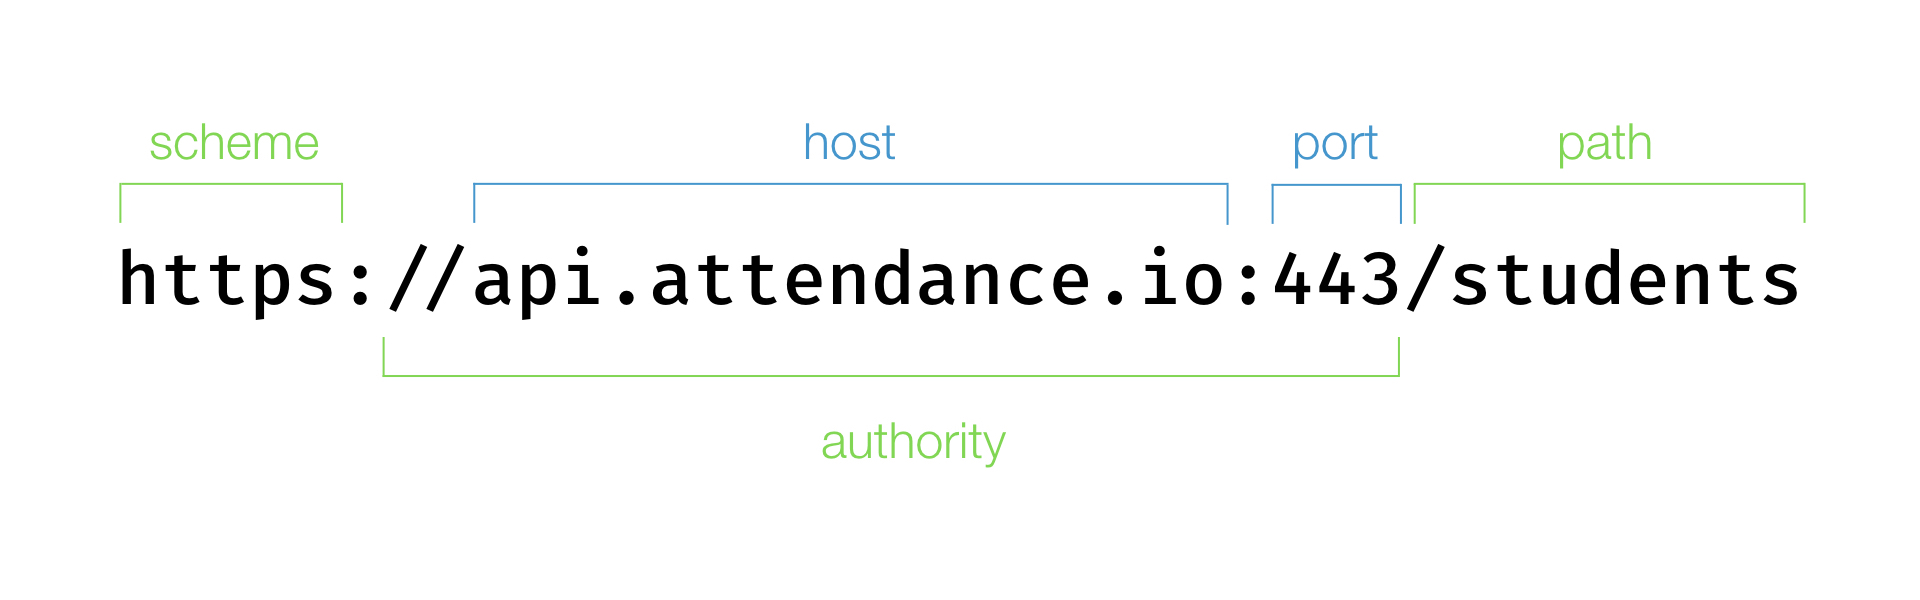
Port number is optional
If it is omitted, the default port for the scheme will be used.
Map HTTP to CRUD
| CRUD Action | HTTP Verb | Resource Path | Description |
|---|---|---|---|
| Create | POST | /students | Create a new member of the resource collection |
| Read | GET | /students | Retrieve the entire resource collection (results may be paginated) |
| Read | GET | /students/1 | Retrieve a specific member of the collection if the path includes a unique identifier segment |
| Update | PUT | /students/1 | Replace all properties of a given member of the resource collection |
| Update | PATCH | /students/1 | Update certain properties of a given member of the resource collection |
| Delete | DELETE | /students/1 | Remove a given member from the resource collection |
Clarification
Some of the example resource paths above use the unique resource identifier 1. This is just an example. You would replace 1 with the correct id value for the desired member of the collection that you wish to act upon.
Response Codes
For each client request received by the server a response should be sent. Included in the header information of that response is a status code. The most common response codes used with RESTful web services are:
| Code | Message | Description |
|---|---|---|
| 200 | OK | The request has succeeded. |
| 201 | Created | The request has succeeded and a new resource has been created as a result of it. This is typically the response sent after a POST request, or after some PUT requests. |
| 400 | Bad Request | The server cannot or will not process the request due to something that is perceived to be a client error. This includes resource object property validation errors. |
| 401 | Unauthorized | Although the HTTP standard specifies "unauthorized", semantically this response means "unauthenticated". That is, the client must authenticate itself to get the requested response. |
| 403 | Forbidden | The client does not have access rights to the content, i.e. they are unauthorized, so server is rejecting to give proper response. Unlike 401, the client's identity is known to the server. |
| 404 | Not found | The server can not find requested resource. In the browser, this means the URL is not recognized. In an API, this can also mean that the endpoint is valid but the resource itself does not exist. |
| 429 | Too many requests | The user has sent too many requests in a given amount of time ("rate limiting"). |
| 500 | Internal server error | The server has encountered a situation it doesn't know how to handle. For example, the application server cannot communicate with the database. |
WARNING
You may still see some web services responding with status code 422 (unprocessable entity) for data validation errors. This used to be quite common. However, the current standards compliant best practice is to use status code 400.
The full list of standard HTTP response codes is detailed on the MDN Web Docs site.
RESTful Express
The Express framework for Node.js makes it easy to define RESTful route handlers. The Express app object has convenient methods that correspond to each of the HTTP verbs. So, for a given resource path like /api/cars from last week's exercise, we can define a full set of CRUD route handlers like this ...
app.get('/api/cars/', (req, res) => {}) // return a collection of cars
app.get('/api/cars/:id', (req, res) => {}) // return the car matching the id value
app.post('/api/cars/', (req, res) => {}) // create a new car
app.patch('/api/cars/:id', (req, res) => {}) // update some properties of a car
app.put('/api/cars/:id', (req, res) => {}) // replace all properties of a car
app.delete('/api/cars/:id', (req, res) => {}) // destroy the record for a car
TIP
The post(), patch(), and put() methods all expect a JSON object in the request body. We need to tell our Express app how to parse the request body.
app.use(express.json())
Route Parameters
In order to apply actions to specific members of a resource collection, we need to be able to capture their unique id from the resource path of the URI. Express makes this simple. From the docs ...
Route parameters are named URL segments that are used to capture the values specified at their position in the URL. The captured values are populated in the
request.paramsobject, with the name of the route parameter specified in the path as their respective keys.
In our route handler functions, we can access the named route parameters via the params property of the request object. In the example routes above we have /cars/:id. The “id” property is available as request.params.id.
The request.params object defaults to {} (an empty object) if there are no route parameters defined.
Route Prefix
To simplify our code and reduce the opportunity for typos in the route path, we can use the app.route() method to get a route object and then chain our HTTP verb methods onto that.
app
  .route('/api/cars')
  .get((req, res) => {})
  .post((req, res) => {})

app
  .route('/api/cars/:id')
  .get((req, res) => {})
  .patch((req, res) => {})
  .put((req, res) => {})
  .delete((req, res) => {})
Manual testing with Postman
Postman is a fantastic tool to assist in developing web service APIs. At the simplest level it is a special HTTP client that let's us easily manipulate the header and body content to test API endpoints. We can also use JavaScript to automate some of our tests.
Postman has an extremely rich set of capability to help throughout the full development lifecycle. You can see the promotional video to get an idea.
We will be using Postman throughout the course as part of our testing regimen. We will start today with manual testing of our Express route handlers.
Download Postman and run the installer.
EX3-1 Express CRUD
Let's take the example routes above and make them functional.
Prepare a week3 project folder
mkdir week3
cd week3
echo ".DS_Store\nnode_modules/" > .gitignore
echo "'use strict'" > app.js
git init
npm init -y
npm install express
git add .
git commit -m "Initialize project folder"
Copy your cars.js file from last week's project folder.
cp ../week2/cars.js ./cars.js
Open the project folder in your code editor.
code .
Stub out the app.js file.
'use strict'

const cars = require('./cars.js')
const express = require('express')
const app = express()

app.use(express.json())

app.get('/api/cars', (req, res) => {})
app.get('/api/cars/:carId', (req, res) => {})
app.post('/api/cars', (req, res) => {})
app.patch('/api/cars/:carId', (req, res) => {})
app.put('/api/cars/:carId', (req, res) => {})
app.delete('/api/cars/:carId', (req, res) => {})

const port = process.env.port || 3030
app.listen(port, () => console.log(`Server listening on port ${port} ...`))
TIP
The process.env.port reference above is checking if we have defined a value for the port in an environment variable. If it exists that value will be assigned to our application's port variable. Otherwise, the default value of 3030 will be assigned.
We will talk more about using environment variables to customize our Node app in the course module on Production Deployment.
1. List the cars collection
app.get('/api/cars', (req, res) => res.send({data: cars}))
Now lets test it with Postman. We need to create a new get request in Postman with the URI of our route above: localhost:3030/api/cars
Because it is a simple get request, we don't need to specify any other details. Just go ahead and click the big blue [Send] button, and then look at the returned results in the lower portion of the screen.
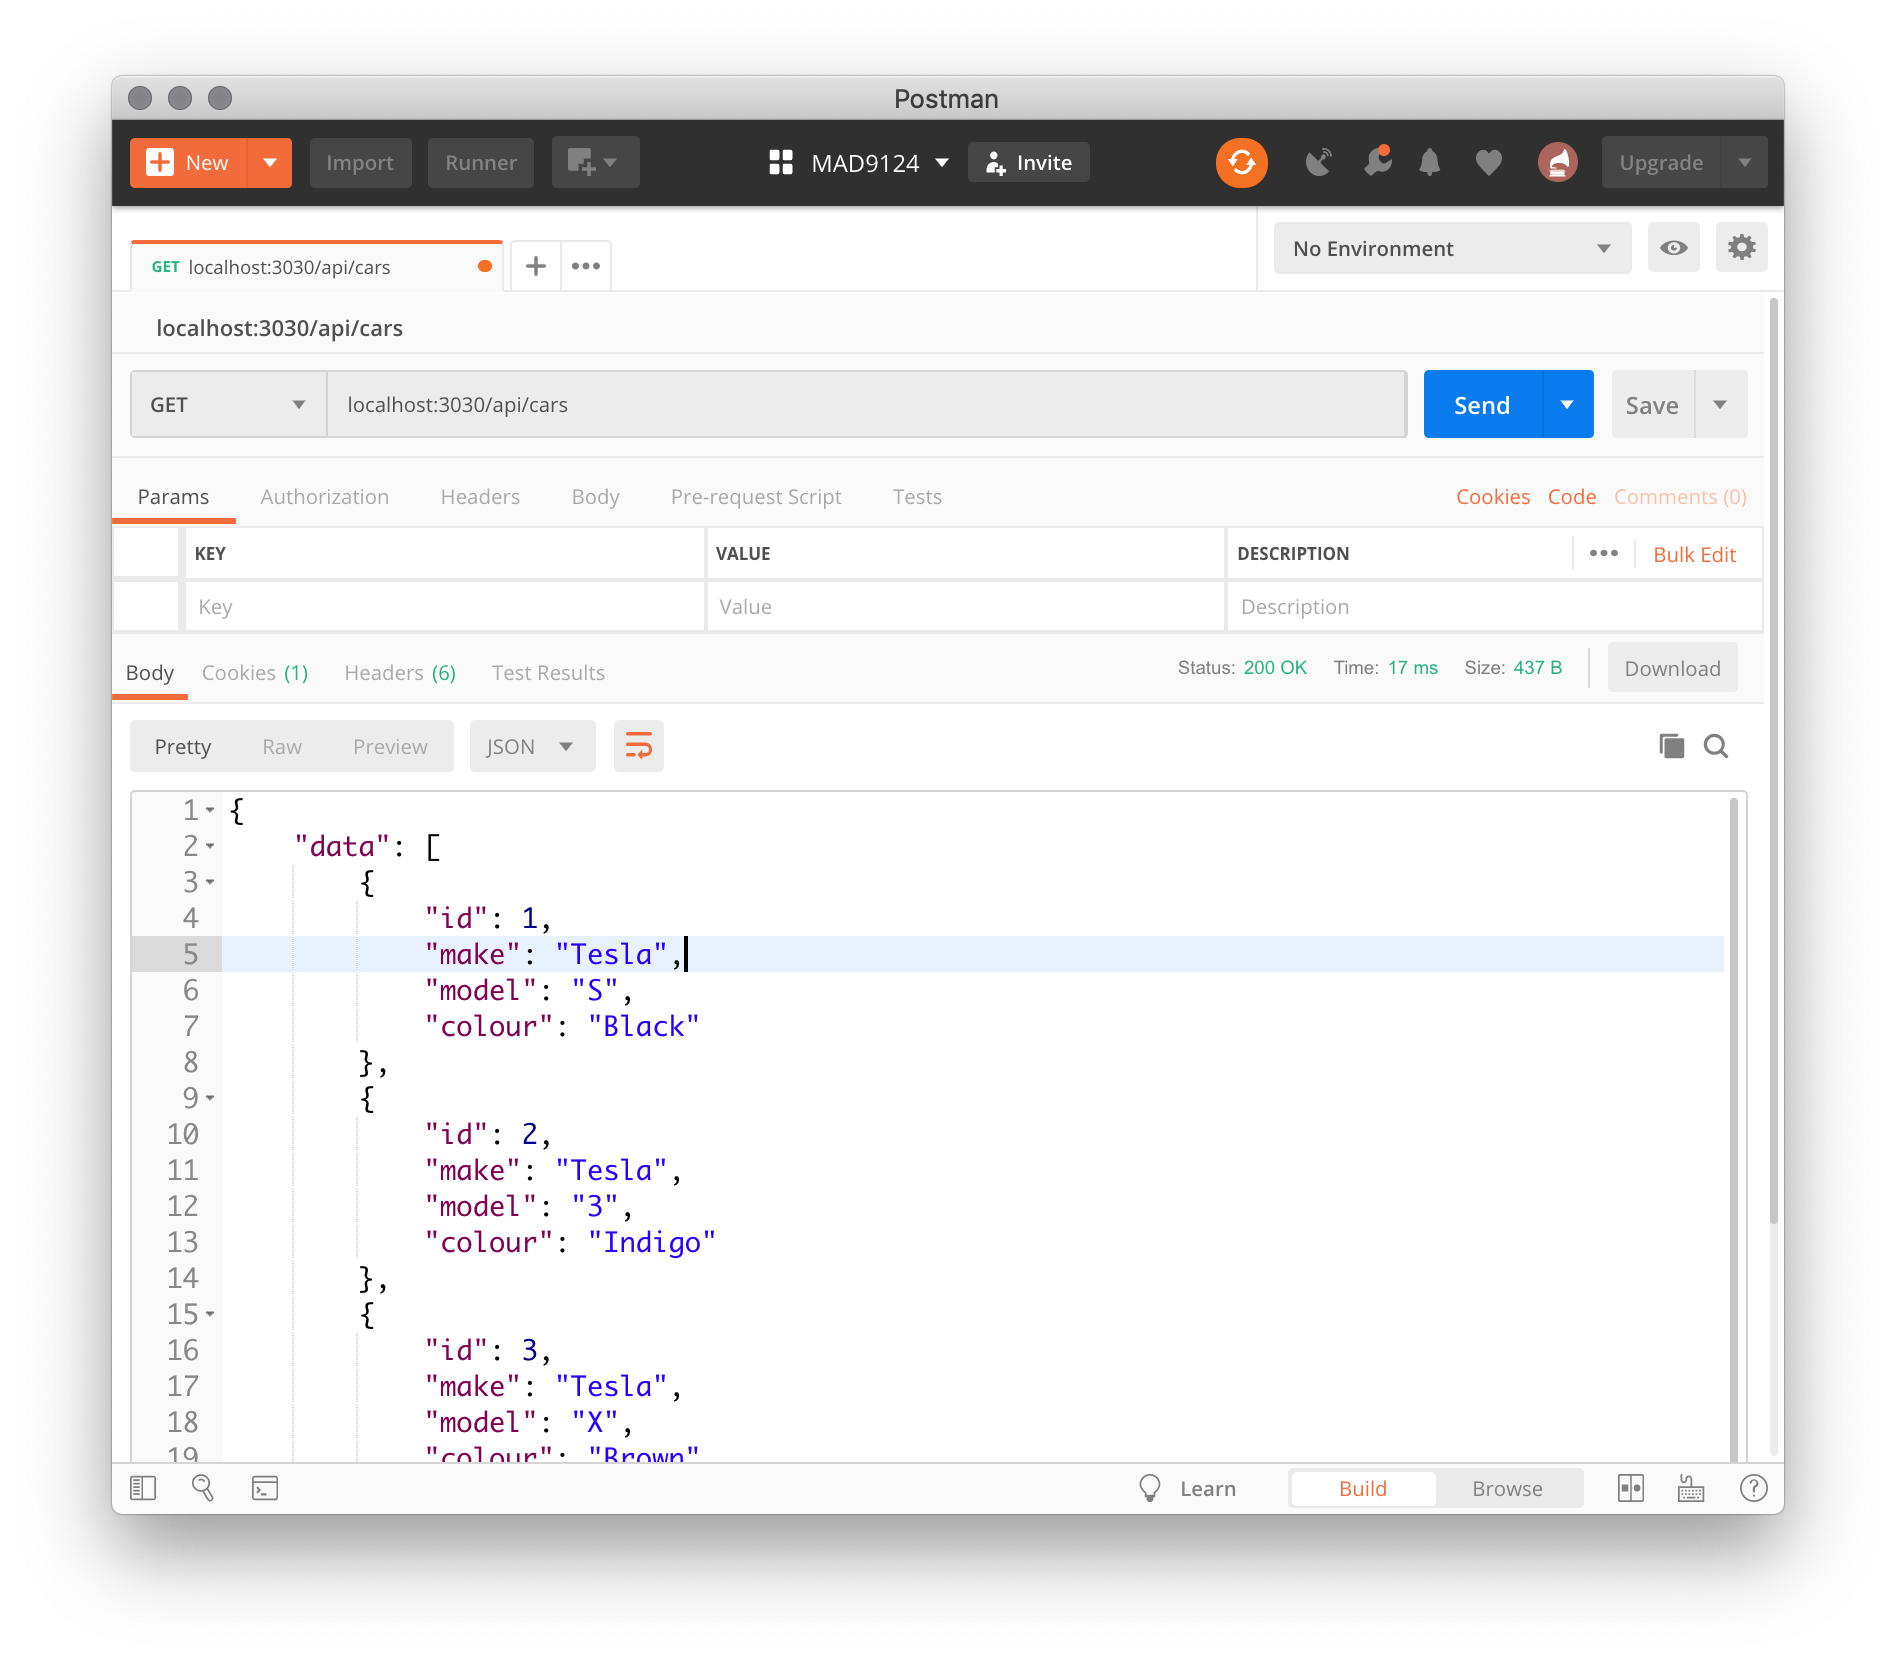
This returns the entire collection of car objects as an array. In later modules you will learn how to break up very large result sets into chunks using pagination.
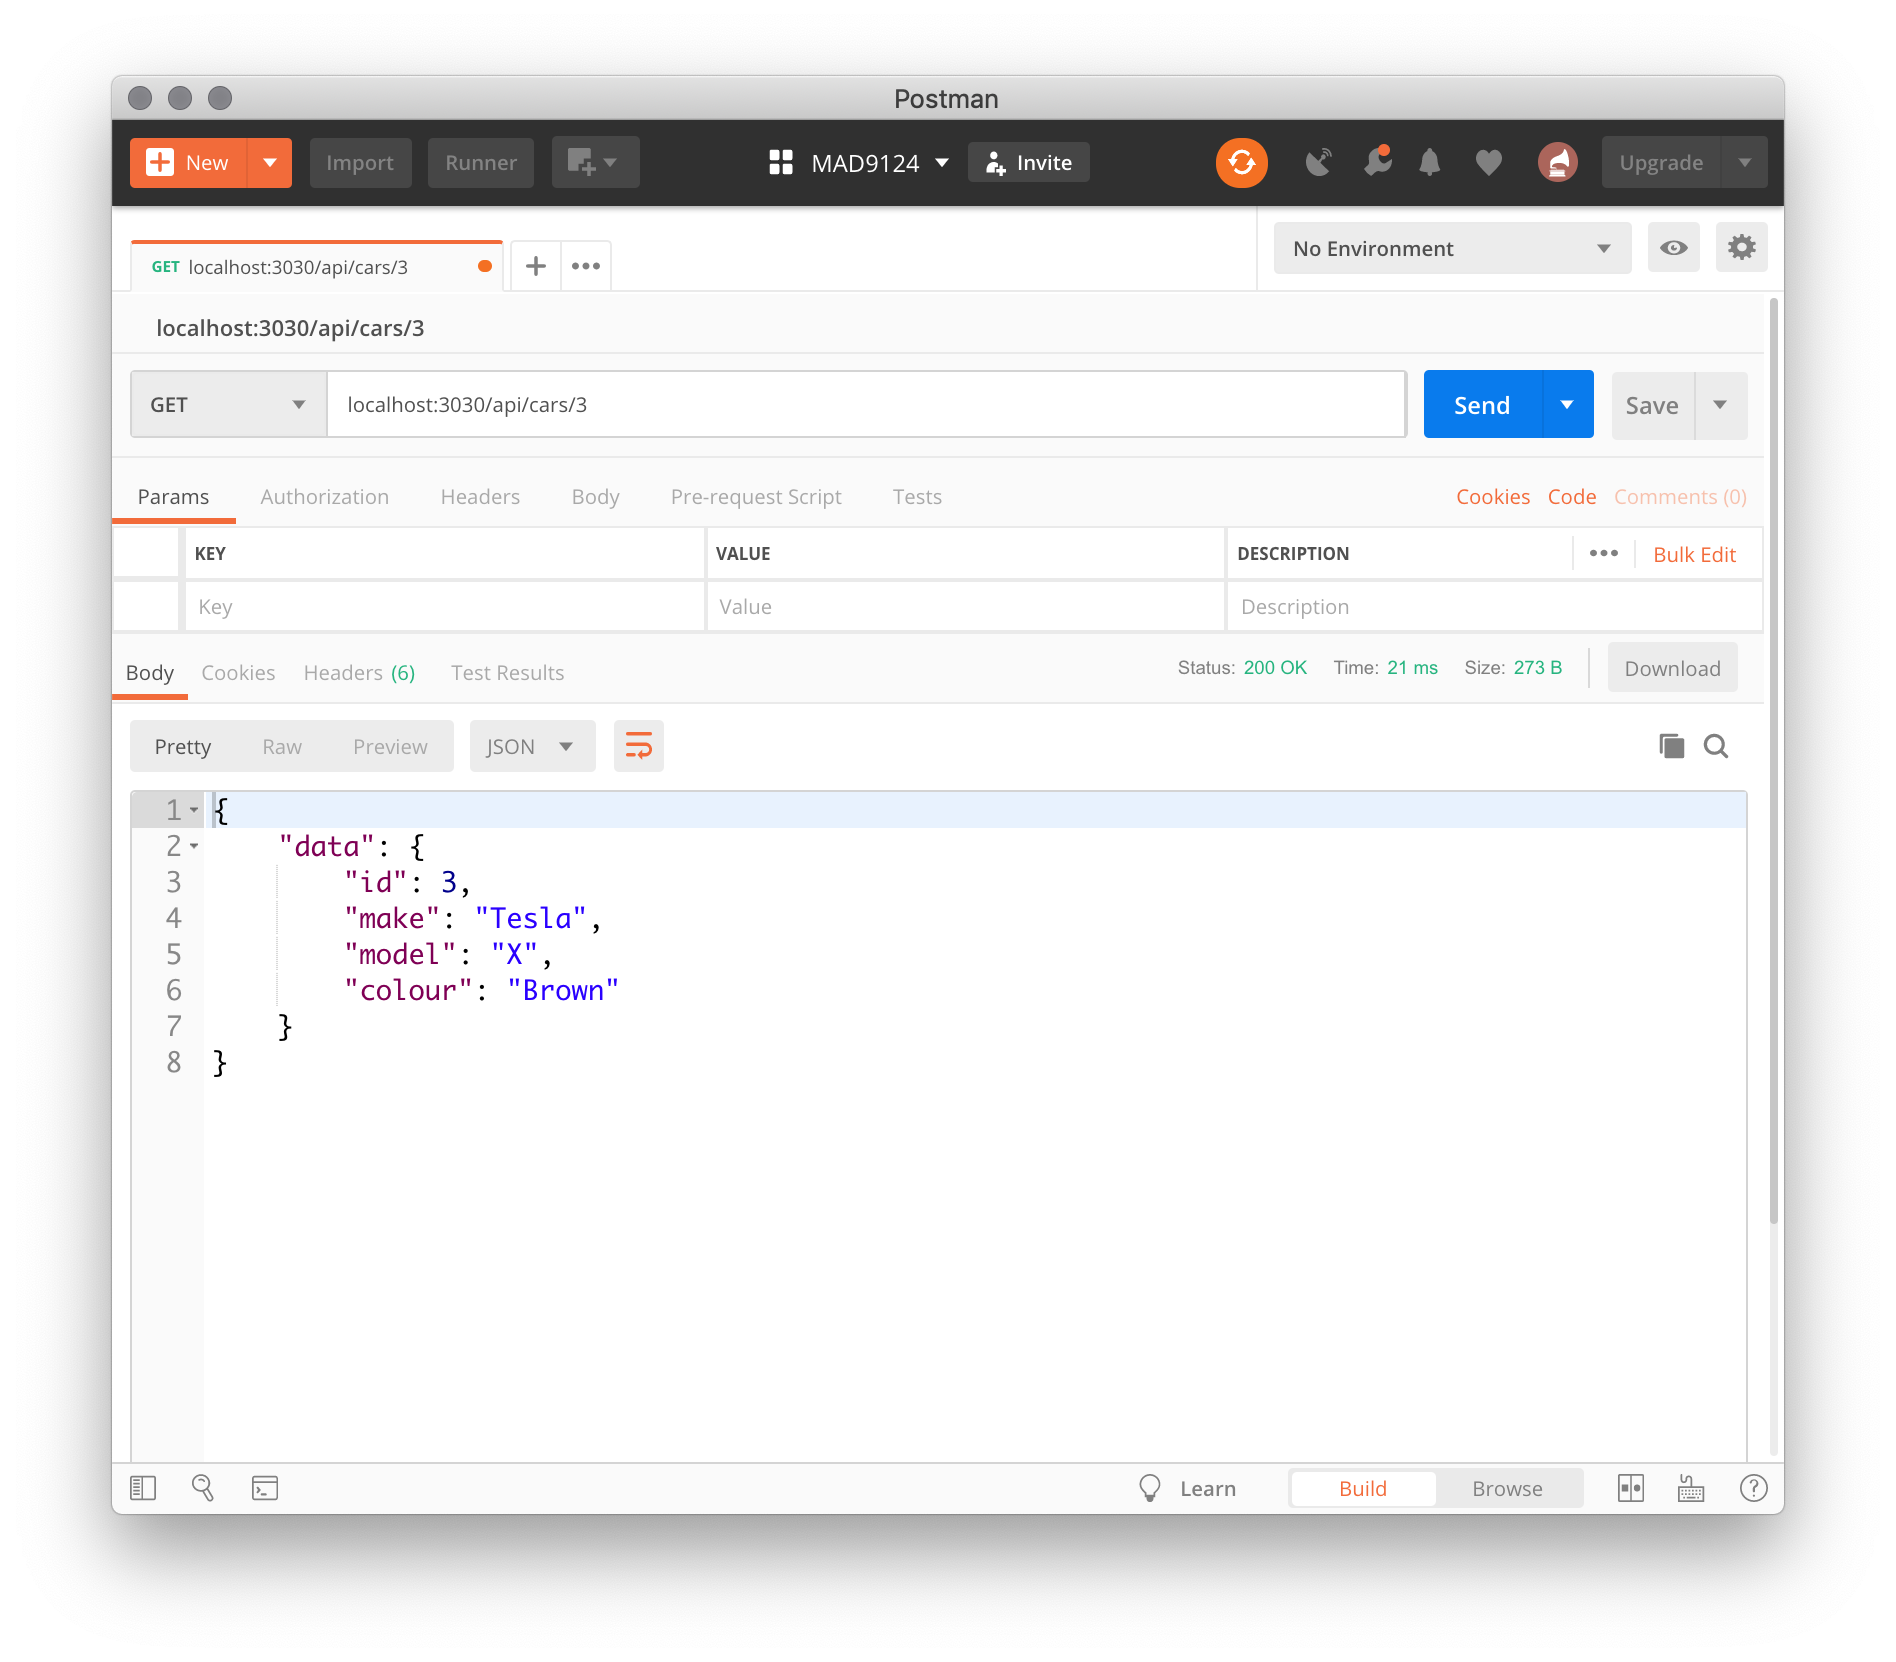
2. Retrieve a single car object
When we know that we are only interested in one particular resource object, and we know it's unique identifier, we append the object's id value to the route e.g. /api/cars/3. In our route handler function we will use that carId parameter to find and return the requested object.
app.get('/api/cars/:carId', (req, res) => {
  const car = cars.find(car => car.id === parseInt(req.params.carId))
  res.send({data: car})
})
TIP
Notice that we need to use the parseInt() function because all parameter values from the HTTP URI are processed with the type string and we want to compare it to a number.
OK. Test it with Postman.
3. Create a new car object
To create a new resource object we use the base collection route (e.g. /api/cars) but with the HTTP verb POST. We pass the details for the object that we want to create as a JSON document in the body of the request. Remember earlier we told Express to parse the request body as JSON with the app.use(express.json()) directive.
We will talk about more robust data validation in later modules, but for now we will simply extract the object properties that we know we need from the request body and create a new unique id using the Date.now() method to get an integer representing the number of milliseconds since midnight on January 1st, 1970. There are better ways to generate a unique id but this will do for now.
Now we have all of the data properties for our new car object and we can use the array.push() method to add the new object to our collection.
Lastly, we need to return the newly created object back to the requesting client. Express will use the 200 status code by default, which is OK, but it is a better practice to send a 201 Created status when successfully processing a create request. Chain on the res.status(201) method before the send() method.
app.post('/api/cars', (req, res) => {
  const {make, model, colour} = req.body
  const newCar = {
    id: Date.now(),
    make,
    model,
    colour
  }
  cars.push(newCar)
  res.status(201).send({data: newCar})
})
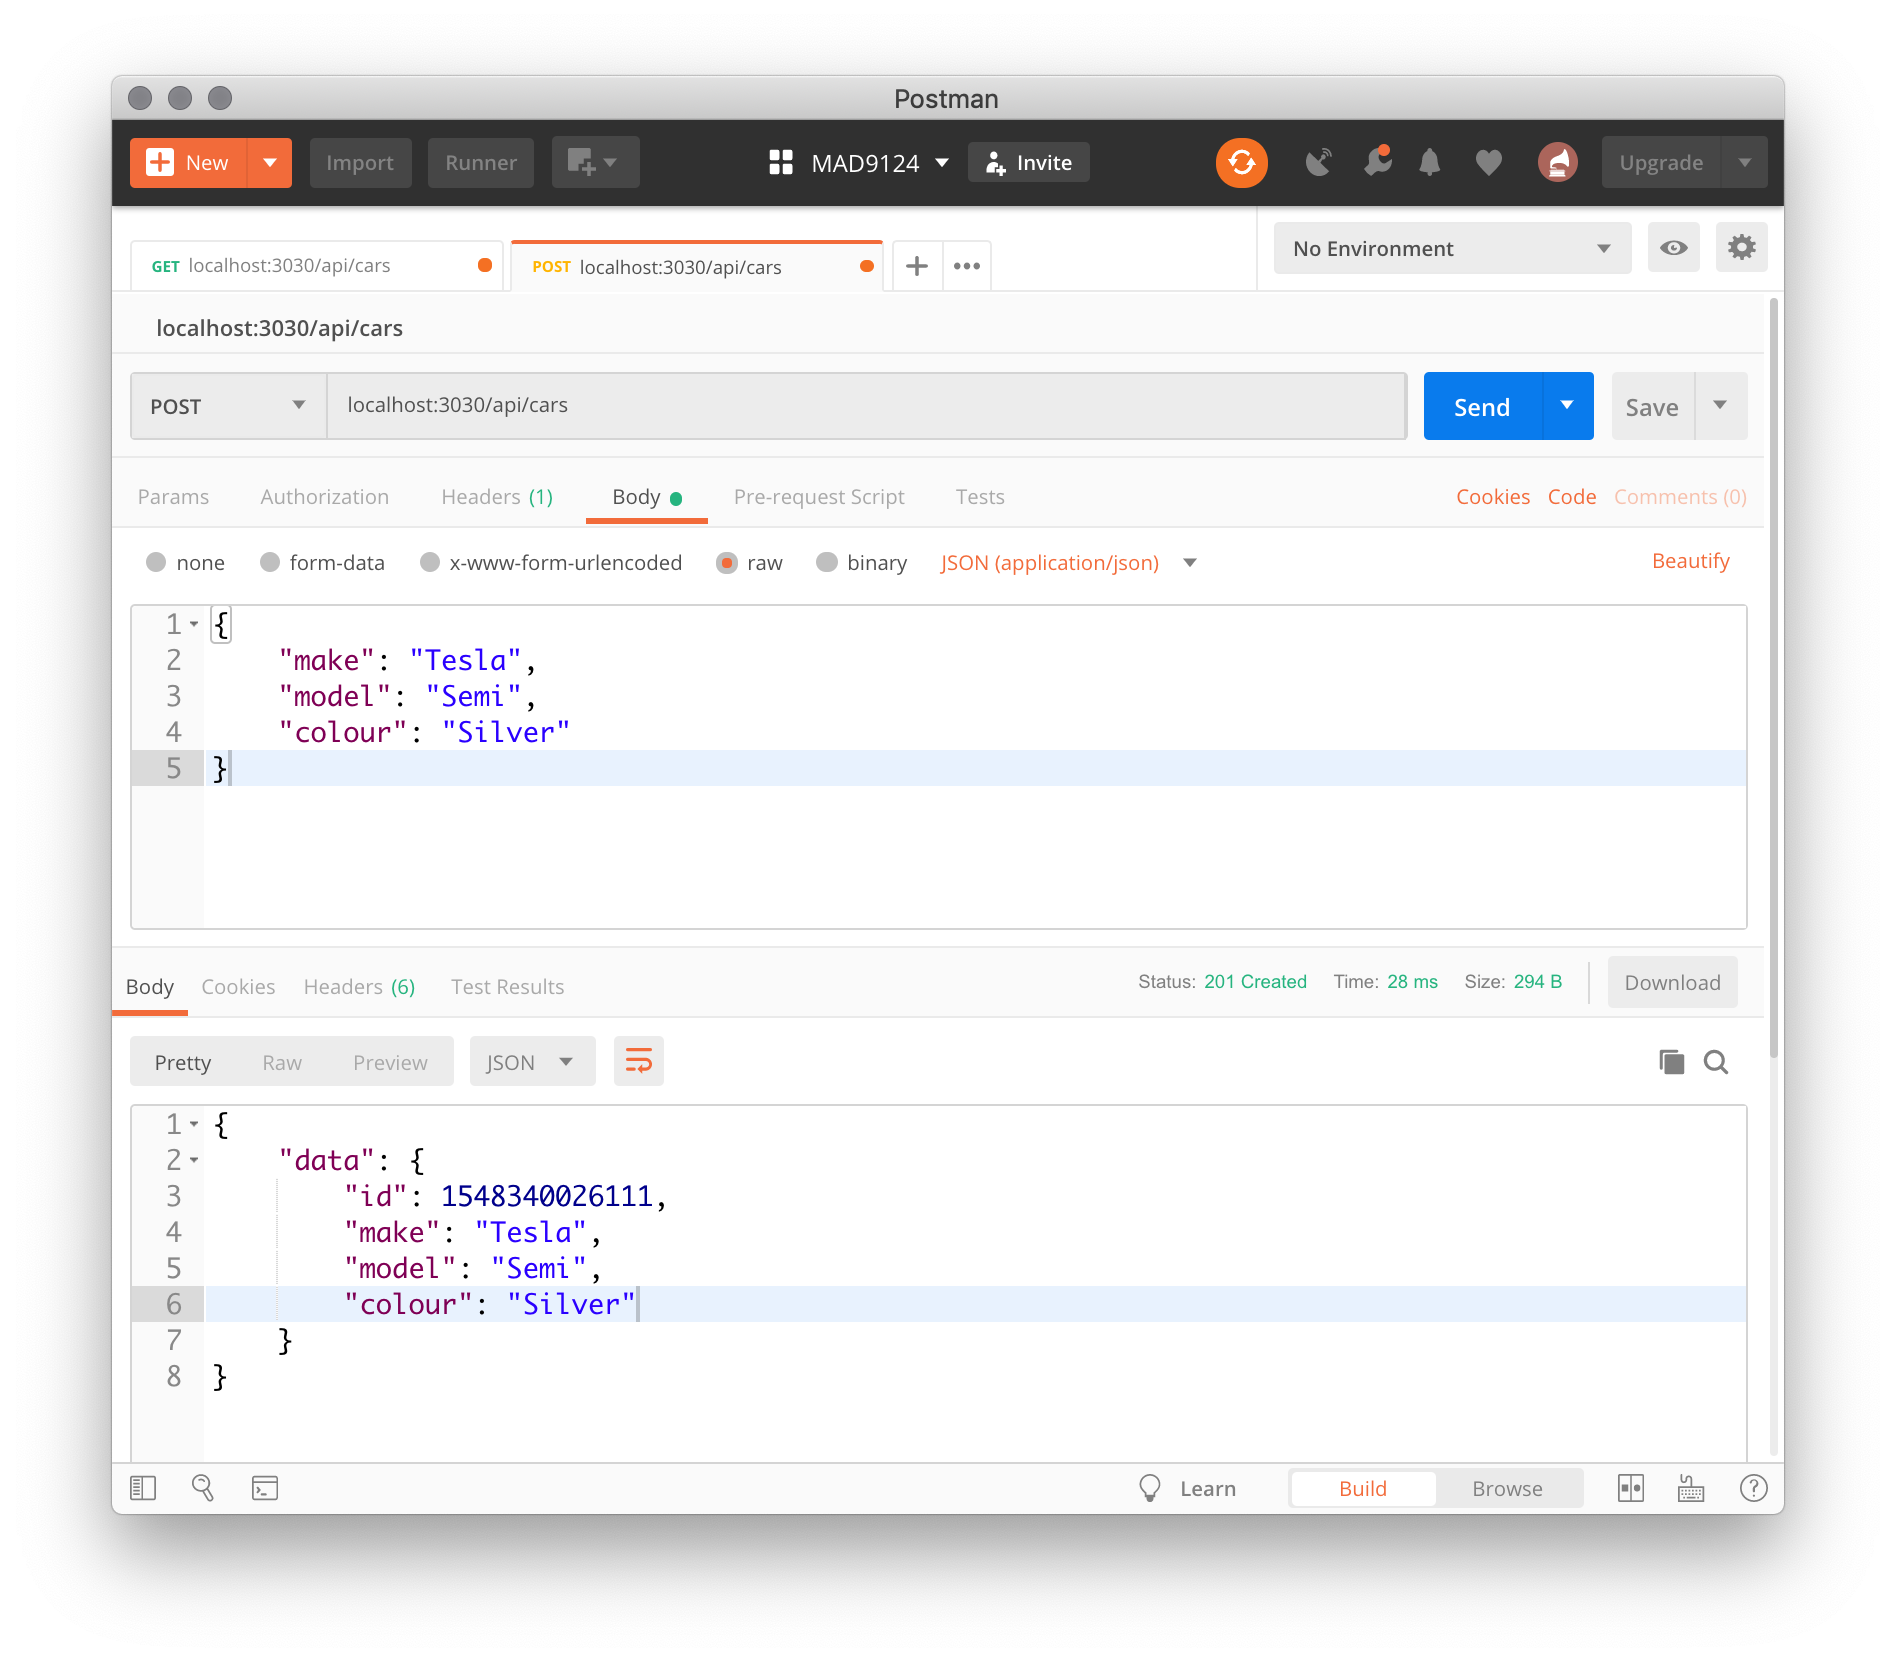
OK. Test it with Postman.
- Create a new request tab.
- Set the type to POST with the same URI:
localhost:3030/api/cars - Under the URI box select the
bodytab - Under body, select the
rawtype - From the dropdown menu at the end of that row, select
JSON (application/json) - Create the JSON document in the large text box in the middle of the screen.
{
  "make": "Tesla",
  "model": "Semi",
  "colour": "Silver"
}
- Click the blue send button
4. Update (replace) an object
There are two methods of updating a resource object: replace and patch. Let's look at the replace method first.
It is similar to the create method, but uses the HTTP verb PUT rather than POST. The request body contains a JSON document with the complete resource object. The URI includes the id in the path just like the GET request.
Our route handler function will extract the object properties and update the collection.
Get the target object's id from the req.params, so that we can find the index of that object in our collection array. The array.findIndex() method works similarly to the array.find() method, but returns the array index of the matching element rather than the element itself.
Following the happy path (no errors), we will extract the resource properties from the req.body, excluding the id property. The client should never be allowed to change the unique id of an object. Using these properties and the carId from the req.params, construct a new resource object and assign it to the collection index position of the old object. Finally return the updated object with a 200 status code.
app.put('/api/cars/:carId', (req, res) => {
  const id = parseInt(req.params.carId)
  const index = cars.findIndex(car => car.id === id)
  const {make, model, colour} = req.body
  const updatedCar = {id, make, model, colour}
  cars[index] = updatedCar
  res.send({data: updatedCar})
})
But, what if the client sent a request with an invalid resource id?
We need to check if we found a valid index. The findIndex() method returns a value of -1 if there was no match and we should send a 404 error response. Our request handler should now look like this ...
app.put('/api/cars/:carId', (req, res) => {
  const id = parseInt(req.params.carId)
  const index = cars.findIndex(car => car.id === id)
  if (index < 0) {
    res.status(404).send({
      errors: [
        {
          status: 'Not found',
          code: '404',
          title: 'Resource does not exist',
          description: `We could not find a car with id: ${id}`
        }
      ]
    })
  } else {
    const {make, model, colour} = req.body
    const updatedCar = {id, make, model, colour}
    cars[index] = updatedCar
    res.send({data: updatedCar})
  }
})
TIP
The format of the errors return value follows the best practice described in the JSON:API specification, which we will look at in more detail in week 9.
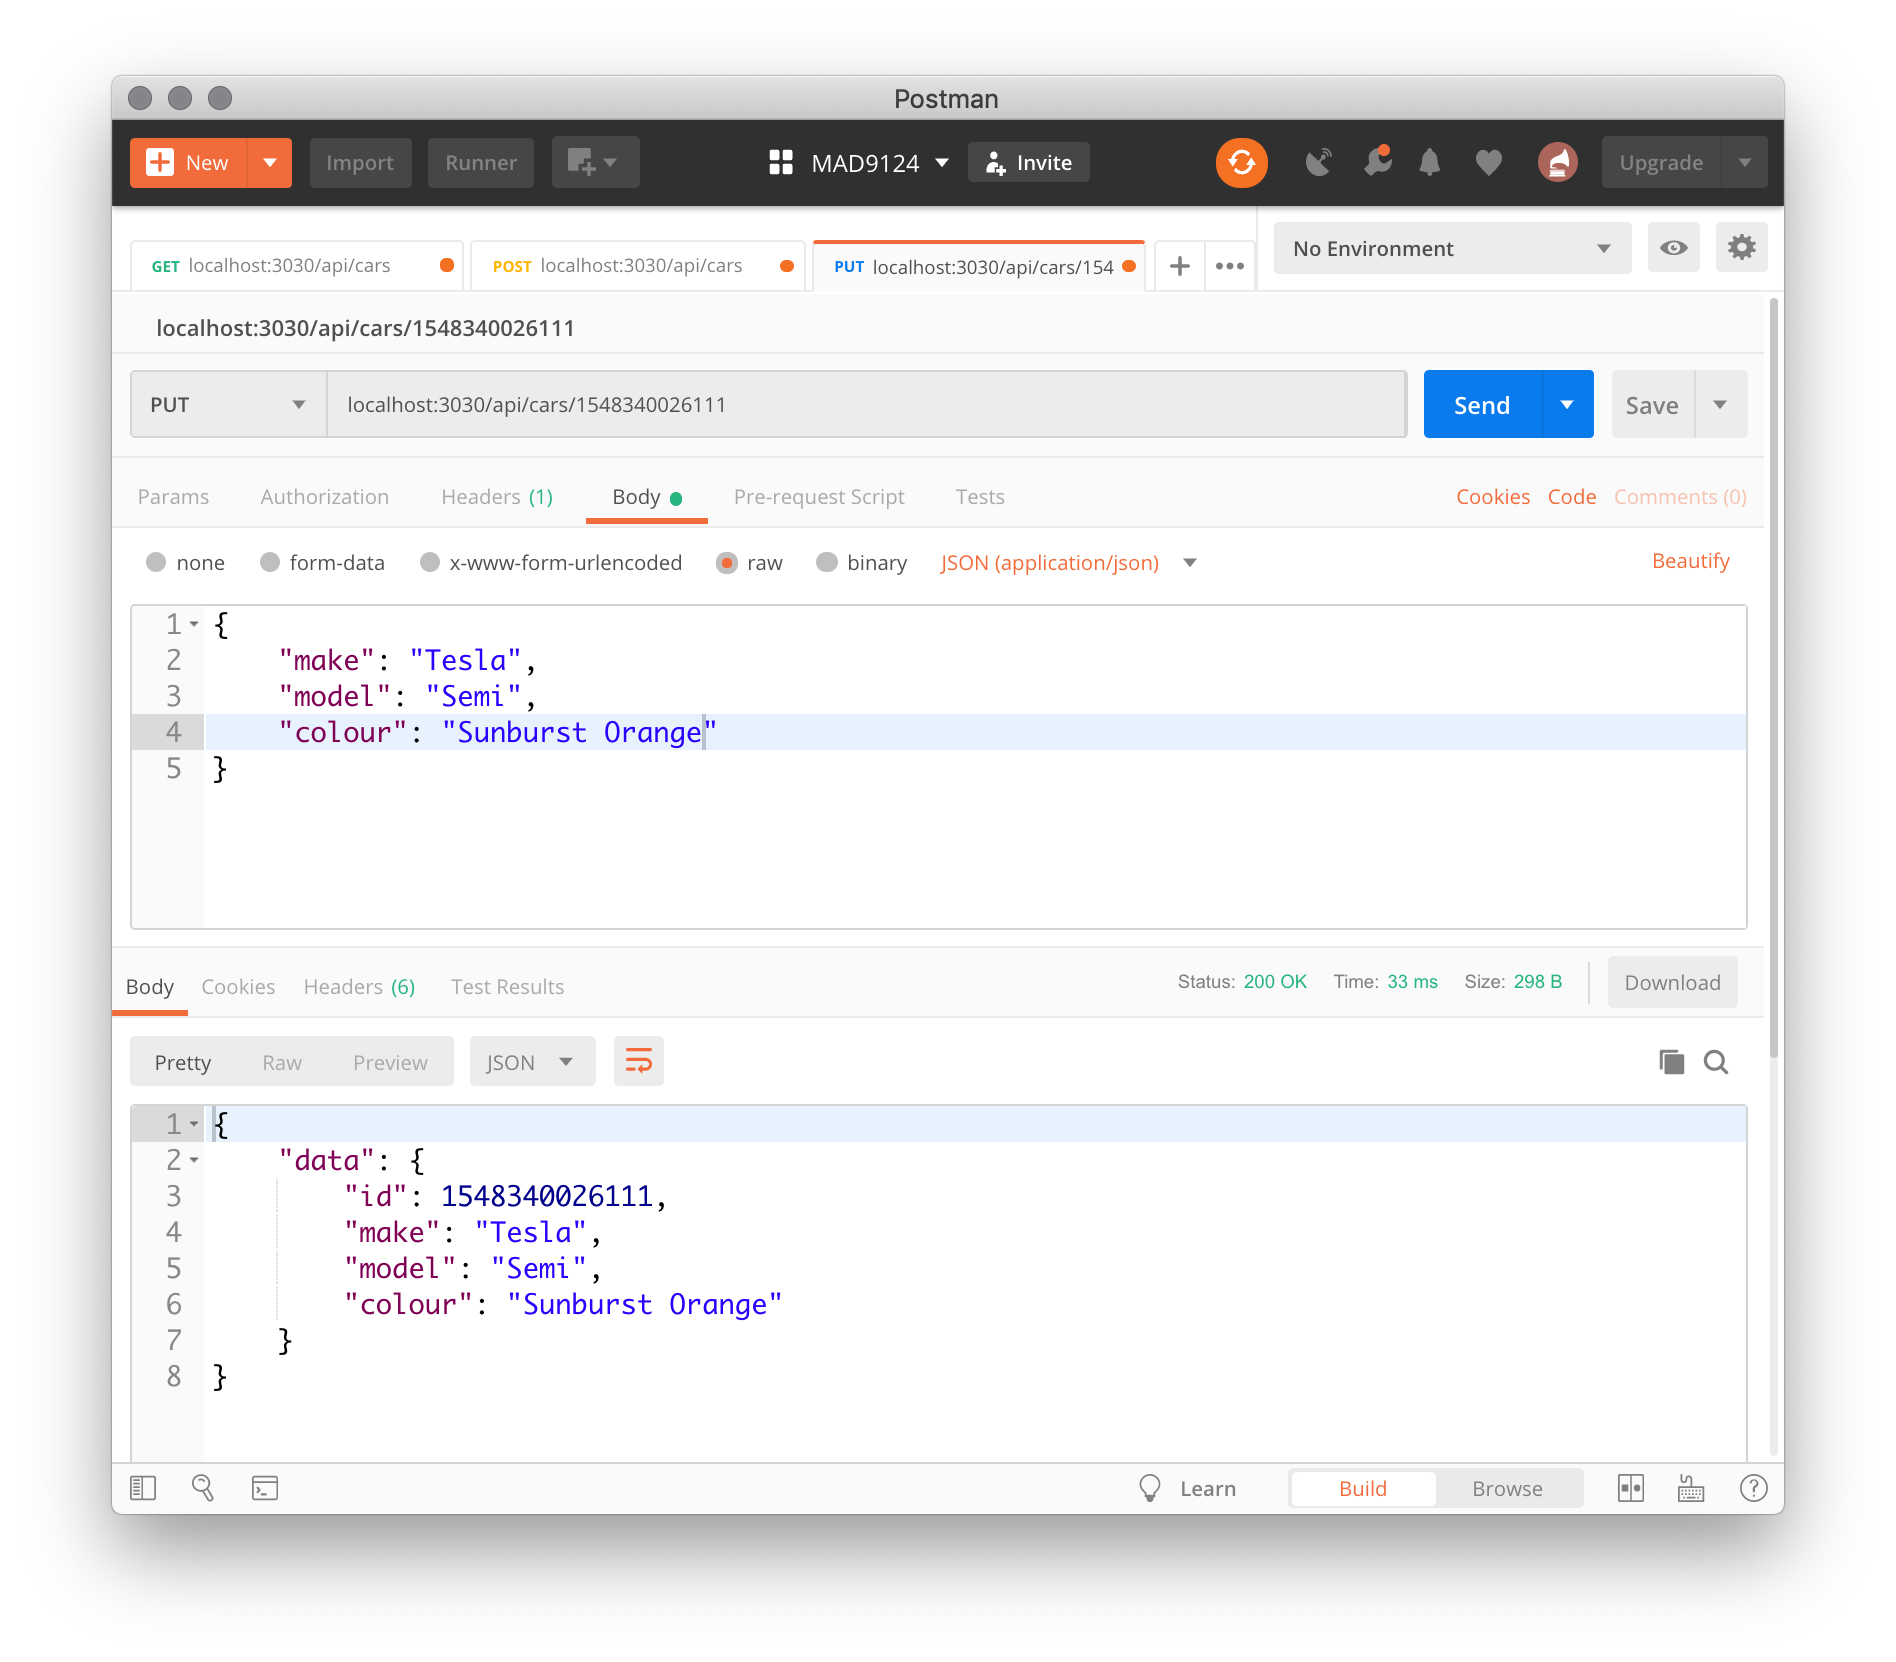
OK. Test it with Postman.
- duplicate the current request tab
- change the method to
PUT - resubmit the
POSTrequest - copy the id from the response body of the POST request and add it to the URI
- edit the JSON body to change the colour to
Sunburst Orange - click the blue send button
5. Update (partial) an object
In a partial update, the client constructs the request body with only the properties that have changed for a given object. The request URI is the same as the PUT method, the HTTP verb is changed to PATCH.
Start by copying the code from the PUT request handler. We will change the first two lines in the else block.
First let's change how we extract the object properties from the req.body. We will use JavaScript's Rest operator in object destructuring. This means we can isolate the id property if it is included in the req.body and stuff all of the remaining properties into a new object variable (every so cleverly named theRest in this example).
The second trick is to use the Object.assign() function to merge the old car object with the updated properties contained in our theRest variable.
app.patch('/api/cars/:carId', (req, res) => {
  const id = parseInt(req.params.carId)
  const index = cars.findIndex(car => car.id === id)
  if (index < 0) {
    res.status(404).send({
      errors: [
        {
          status: 'Not found',
          code: '404',
          title: 'Resource does not exist',
          description: `We could not find a car with id: ${id}`
        }
      ]
    })
  } else {
    const {id, ...theRest} = req.body
    const updatedCar = Object.assign({}, cars[index], theRest)
    cars[index] = updatedCar
    res.send({data: updatedCar})
  }
})
OK. Test it with Postman.
- duplicate the current request tab
- change the method to
PATCH - resubmit the
POSTrequest - copy the id from the response body of the POST request and add it to the URI
- edit the JSON body to change the colour to
Candy Apple Red - click the blue send button

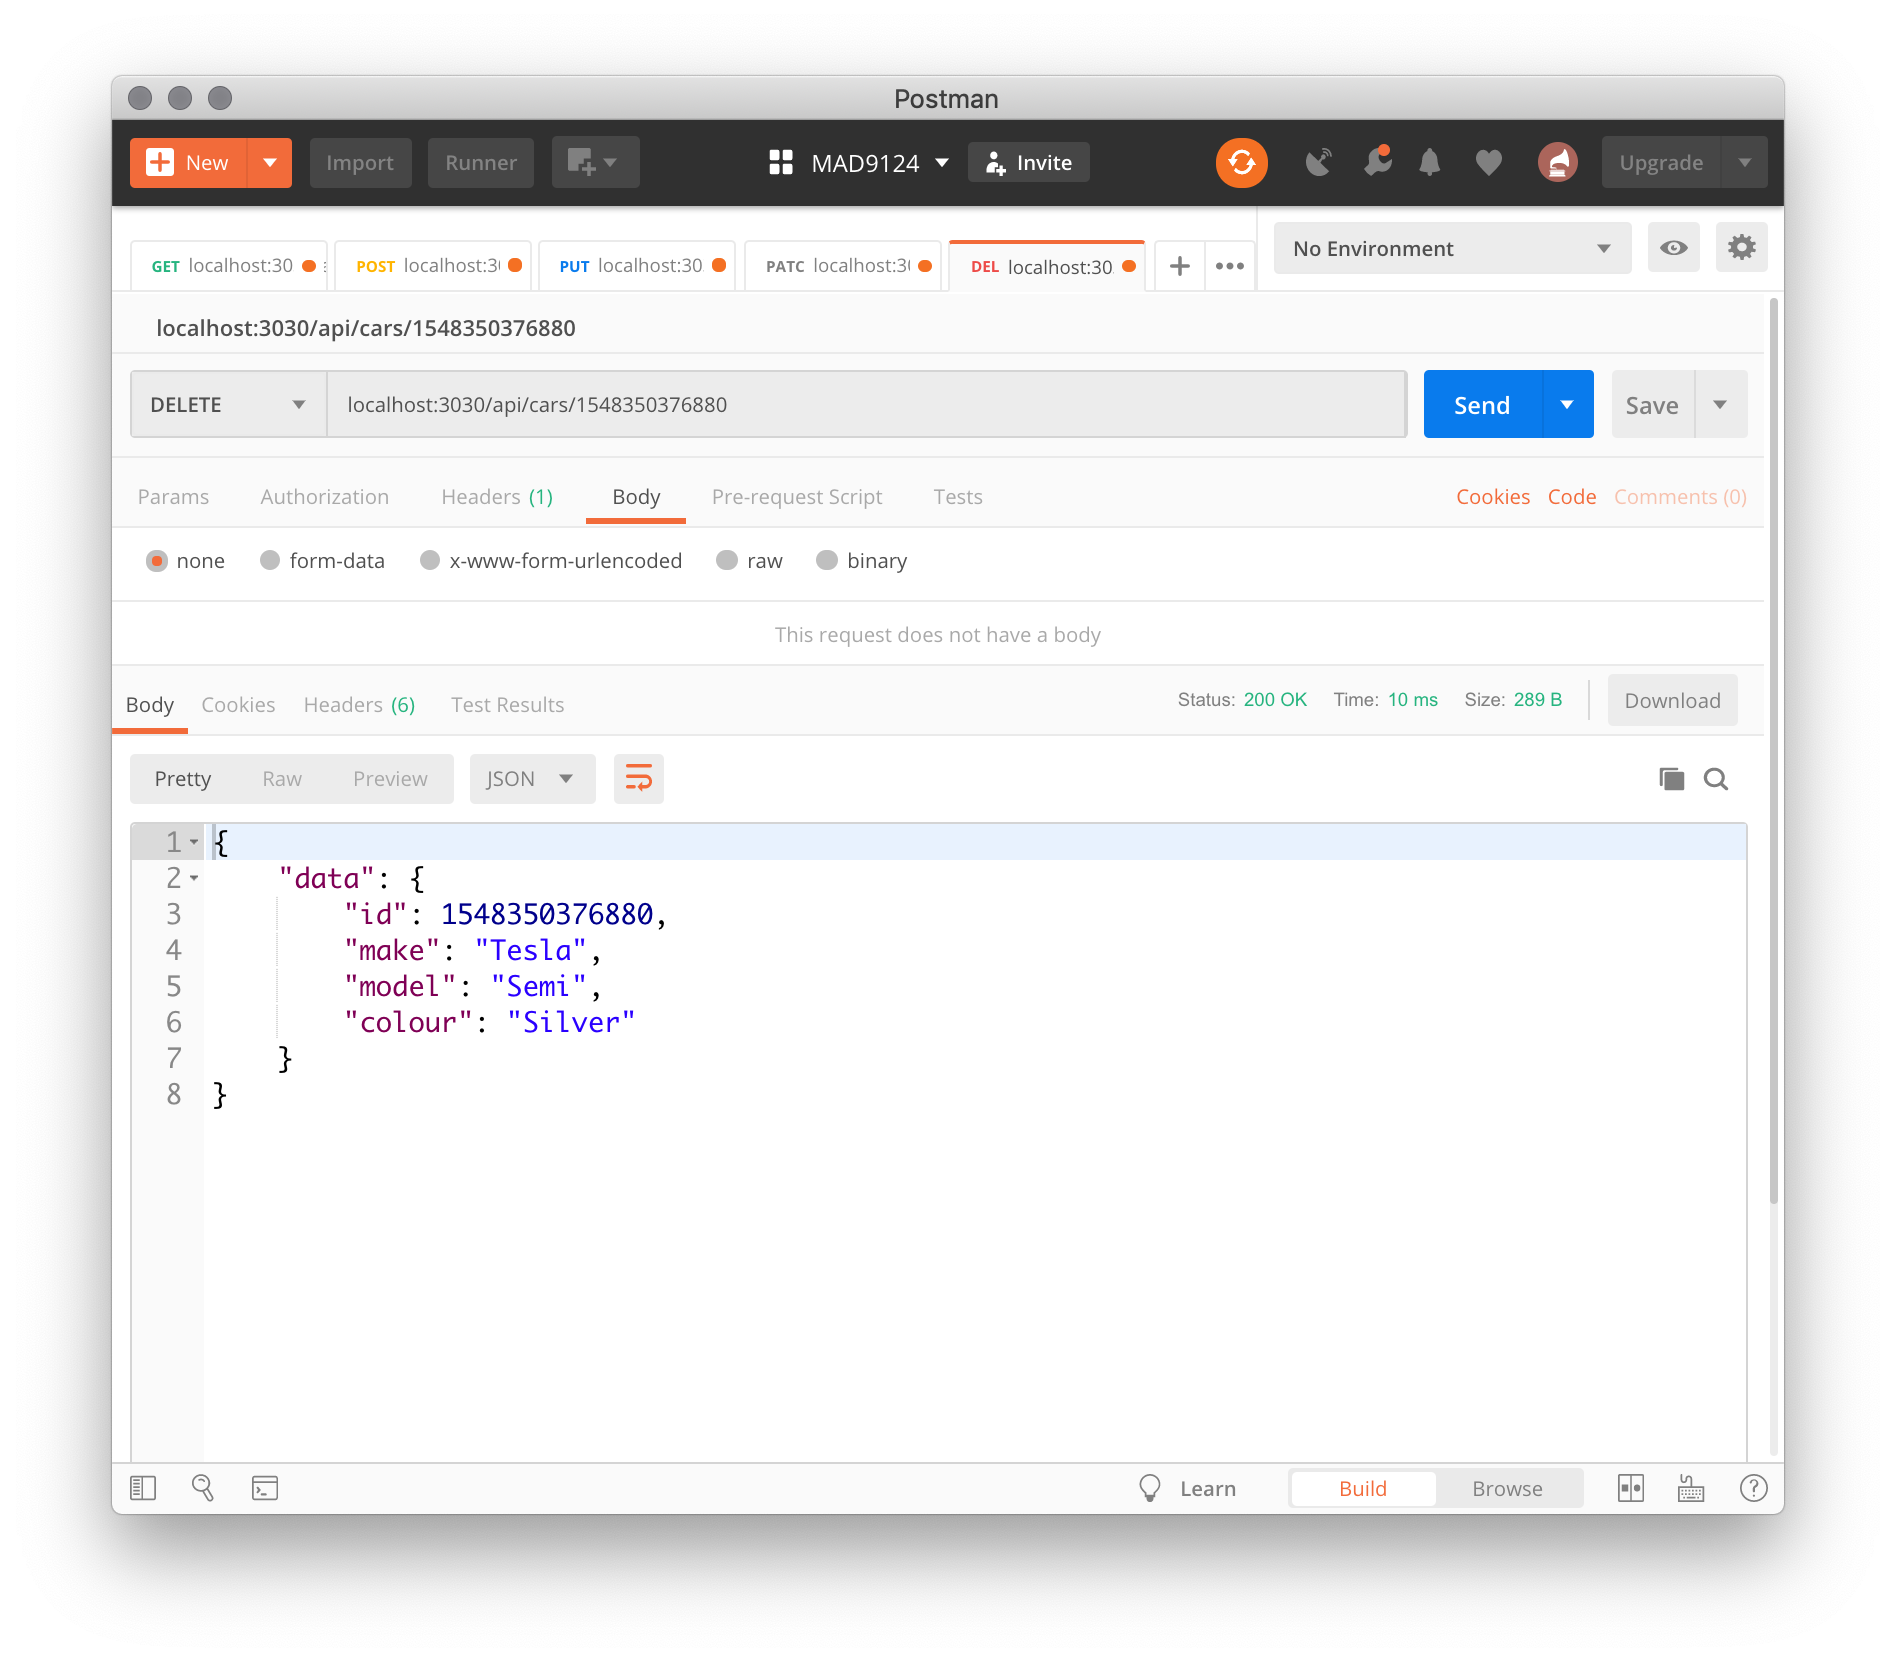
6. Delete an object
OK. You have seen the pattern. Now complete this last one on your own.
- The HTTP verb is DELETE
- A delete request has no request body
- Check to see if the carId parameter exists, send an error if not
- Find the index of the car object in the array
- Remove that one element from the array (hint)
- Return the removed object in the response
Test it with Postman. It should look like this ...
Submit
Create a new private repo on GitHub named mad9124-ex3-userid (please substitute your college userid. i.e. mine would look like mad9124-ex3-mckennr).
Make sure that you have initialized your local project folder with git init and created a .gitignore file to exclude the node_modules folder from your git archive.
Create a commit to include all of your work from today.
Link the local repo to the GitHub repo and sync them up.
Remember to add me as a collaborator so that I can see your code, and submit the GitHub repo's URL on Brightspace.
For next week
Before next week's class, please read these additional online resources.
A Beginner’s Guide to Server-Side Web Development with Node.js
Introduction to Postman video
How to use NPM video
What is JSON video
JSON vs JS Objects video
Quiz
There will be a short quiz next class. The questions could come from any of the material referenced above.